Linear Laundry
About Linear Laundry
The Story
Licensing and Pricing (free)
Functions / How do I use it?
Comparison vs. Other programs
Frequently Asked Questions

About Linear Laundry
Linear Laundry is primarily a set of Photoshop actions for developing linear PSDs. It's different than other solutions because it's
non-destructive. This means that it doesn't blow out highlights or shadows, nor does it modify the original image (all changes are made on adjustment layers above the original). Linear Laundry includes four 'development' scripts, two sharpening scripts, and three scripts for batch processing.
It also includes two applications for Mac OS X for converting RAW photos to PSDs, and batch-processing an entire roll. Both of these applications include a copy of dcraw for Mac OS X, so you don't need to set it up yourself.
Important Note: Linear Laundry was developed and tested using RAW images from a Canon 300D (Digital Rebel). It should work well on other raw files, but your mileage may vary a bit. Please let me know how it works if you're using a different camera!
The Story
Linear Laundry's story began at a party in Ithaca one friday night. Because I'm fairly geeky myself, and seem to hang out with equally geeky folks, at some point the conversation turned to RAW digital photos. Being somewhat of a purist when it comes to photography, I dove right in. I'd always shot in RAW because I didn't want to lose any of the image that hit the sensor. Thus, I was shocked to find out that the each sensor in the image only sensed one of the three colors, and the rest of the image was
interpolated. So much for purity.
Thus began the exploration into linear RAWs, curves, levels, and a too many solutions that just didn't work. See, I have this pet peeve: blown out highlights. When I started digging into the RAW photos, i realized that they weren't blown out in the RAW photo, but by the image processing software. Then I was irked, and irked programmers only know one solution: Write your own tool.
I ditched Canon's File Viewer Utility quickly, and moved onto
Dave Coffin's dcraw to turn my RAW files into linear PSDs. Free, open source, fast, and high-quality. So far, so good.
The next step was to take those (dark) linear PSDs, and turn them into real photos. I tried Pekka Saarinen's
LinearSharpen actions for photoshop. Pretty good, and free/open but it still killed my highlights. Then, after reading one too many raves about Fred Miranda's photoshop actions and customized color profile, I broke down and spent $15 to buy it. Wasted money. Fred's actions blew out my PSDs worse than the free LinearSharpen suite. So, it was time to code my own. Three weeks later, Linear Laundry was making beautiful photos
and saving my highlights.
Thanks go to Atilla for starting me on the RAW journey, Dave Coffin for coding dcraw, Pekka Saarinen for some ideas from LinearSharpen, and Fred Miranda for inspiring me to make something that is free and
actually works.
Licensing and Pricing
Linear Laundry is free (no cost) and open source. You're allowed to use it on your commercial photos however you'd like. You're also free to change it to fit your needs, or make improvements.
There are two restrictions to the license:
1. If you make improvements and develop a spin-off version, you must share the source openly, under terms as liberal as this license.
2. You are not allowed to charge money for any program, actions, or script derived from the Linear Laundry code.
Have fun!
Functions / How do I use it?
You can use the actions by opening the Actions panel in photoshop, clicking on the action you want to run, and hitting the 'Play' arrow at the bottom of the panel. Then, stay far from the keyboard for a few seconds so as to not upset the photoshop gods.

Below are each of the actions, and a sample of how they develop the following image:
original RAW
Gentle Cycle
This is the bread-and-butter of Linear Laundry.
Gentle Cycle fully develops from a linear source to a bright, saturated image. It takes a bit (~30 seconds on a Powerbook 1.33Ghz), but that's because it's being very careful with your highlights.
Note that all of the changes are added as adjustment layers, so you're free to easily tweak the color, saturation, or brightness to meet your needs.

Quick Rinse
Quick Rinse is a very fast, fairly rough development of an image. It does a decent job with color reproduction and saturation, but it's not perfect. You'll notice the contrast isn't as good as
Gentle Cycle, but you'll also notice that you probably don't even see it run.
Quick Rinse takes about 2 seconds on my Powerbook.
Bleach an' a Bucket
Don't care about highlights? Too cheap to buy a Holga? Try
Bleach an' a Bucket. It makes no promises about highlights, color accuracy, or much else, but occasionally, it will give you a really nice effect. Other times, it will make a horrible picture. Think your shirt in a bucket with bleach. Sometimes it works, sometimes it doesn't.
Ansel Adams
Black and White. Surprised? There's a bit of selective shading based on color happening here, which should give a slightly richer photo than the average black and white photo. Note that this action can be used on already developed photos, you'll just want to hide the curves layer so things aren't blown out.
Tumble Dry Low
This is a gentle sharpen and blur tool.
Tumble Dry Low slightly sharpens the edges it finds in the image, and gives a slight blur & unsharp mask to the rest of the image. The effects are subtle, and you shouldn't see any artifacts in the finished photo.
High Heat
High Heat is a more intense version of
Tumble Dry Low. It strongly sharpens edges, and gives a bigger blur to the background. There may be slight pixelation around the sharpened edges, so use with care.

Gimme a JPEG
Gimme a JPEG just changes the color profile to be ready for the web, and drops the image to 8-bit color (we've been in 16-bit the rest of the time). It opens a "Save as.." dialog, and you're prompted where you want to drop it.
Credit goes to Pekka Saarinen for LinearSharpen. I do the same thing he did.
Full Load
Full Load runs
Gentle Cycle and
Tumble Dry Low on an image, saves a JPEG, saves the photoshop file, and closes itself. This is primarily to make batch development of a folder of RAW files easy.
Note that it tries to save the JPEG into a folder called "RAW Darkroom" in the "Pictures" folder. If you don't have one of those folders, you may need to change that part of the action to fit your setup.
Full Load w/ Save Prompt
This runs the same set of action as the regular
Full Load, but prompts you where you want to save the JPEG. This is an easy solution if you want to fully develop a linear file, but want to keep working on it in Photoshop by hand afterwards.
Process Full Darkroom.app
This is a batch-processing program for Mac OS X that will develop an entire folder of RAW images, clean up, and put the resulting images in iPhoto.
Process Full Darkroom assumes the following:
- You have two folders in your Home/Pictures directory: 'RAW Darkroom' and 'RAW Negatives'. RAW Darkroom is where we keep the files temporarily while processing them, RAW Negatives is where we store the original RAW negative for archiving.
- You're using Image Capture to download the Images. Set Image Capture to download to 'Pictures, Movies, and Music', and make sure it's set up to download all files from the CF card (both CRW and THM files, for Canon cameras).
- Image capture is set to run Process Full Darkroom.app after downloading.
Process Full Darkroom performs the following actions on each RAW Negative:
- Develops the RAW file into a Linear PSD
- Opens the image in Photoshop, and runs the 'Full Load' action of Linear Laundry
- Saves a JPEG to your RAW Darkroom folder
- Deletes the Photoshop file
- Re-adds the camera EXIF information (exposure, aperture, etc) back onto the JPEG
- Adds the JPEG into iPhoto
RAW to Linear PSD.app
This program is a one-shot conversion from a RAW negative to a Linear PSD. It includes and uses dcraw to do the conversion. To use it, just select the RAW files you want to develop, and drag on to the 'Raw to Linear PSD.app' icon. The program will do the rest.
Comparison vs. Other programs
Head to Head: Linear Laundry vs Fred's LPBatch vs LinearSharpen vs Canon's File Viewer Utility
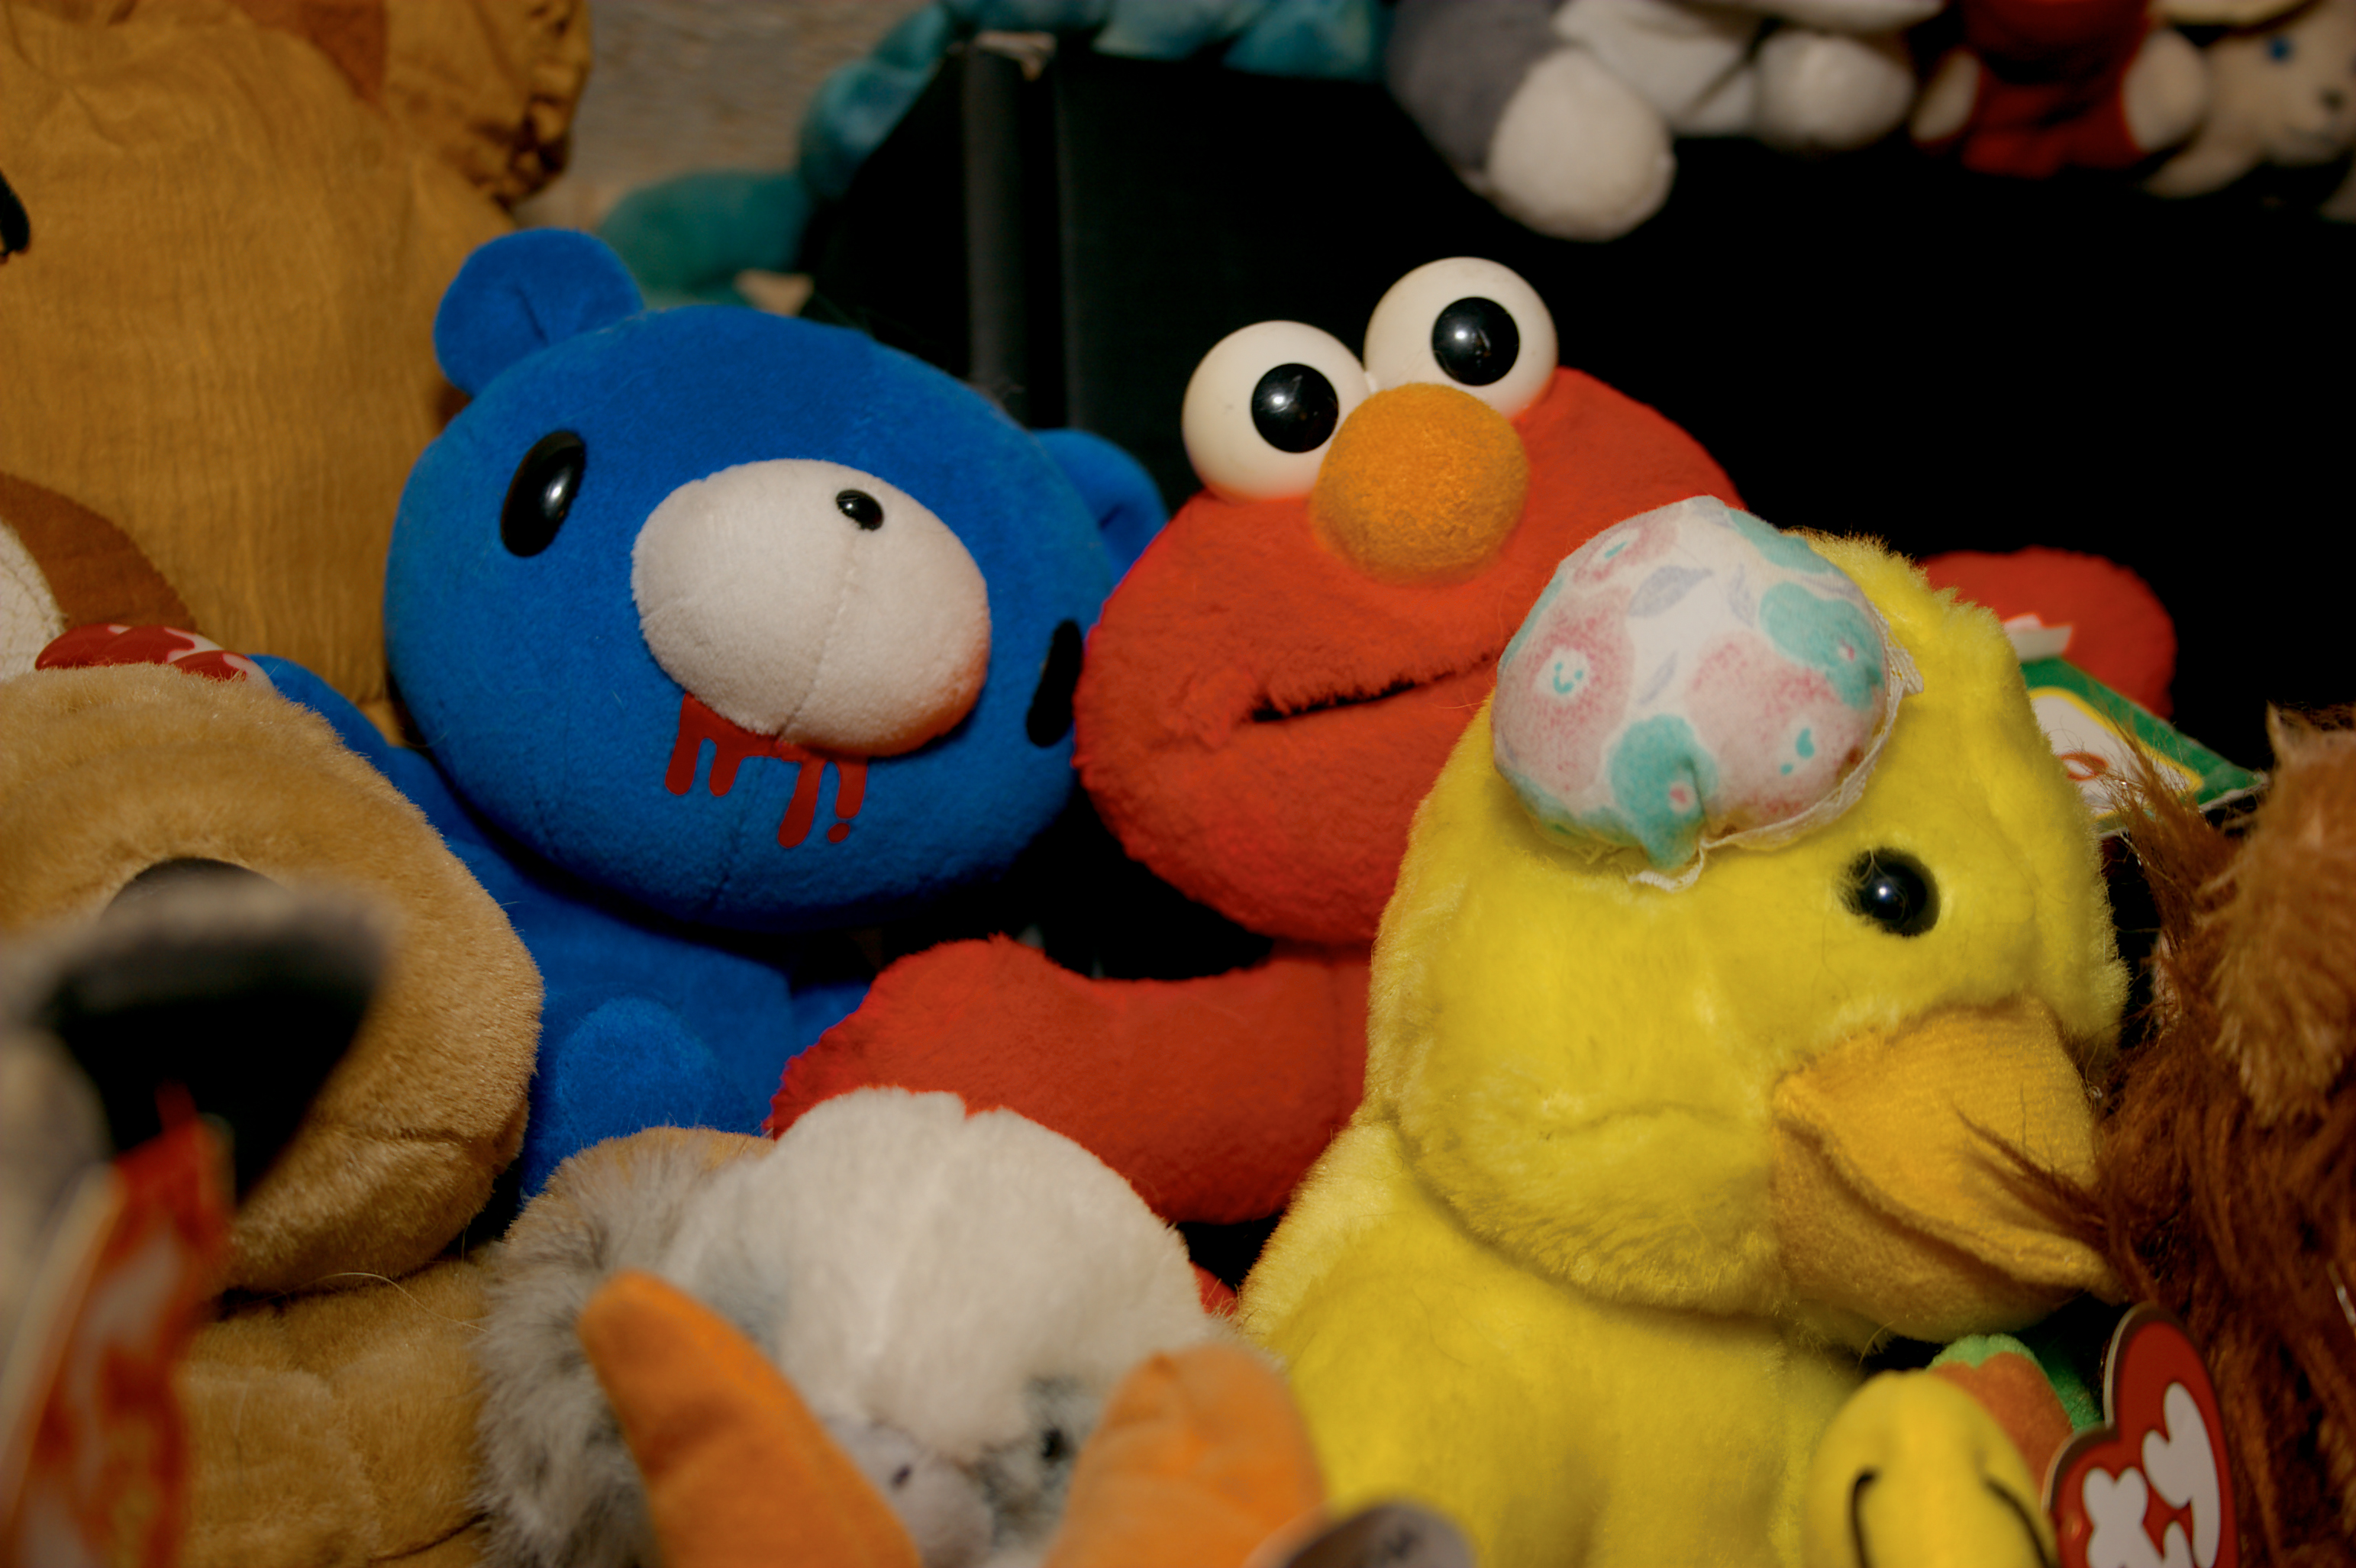
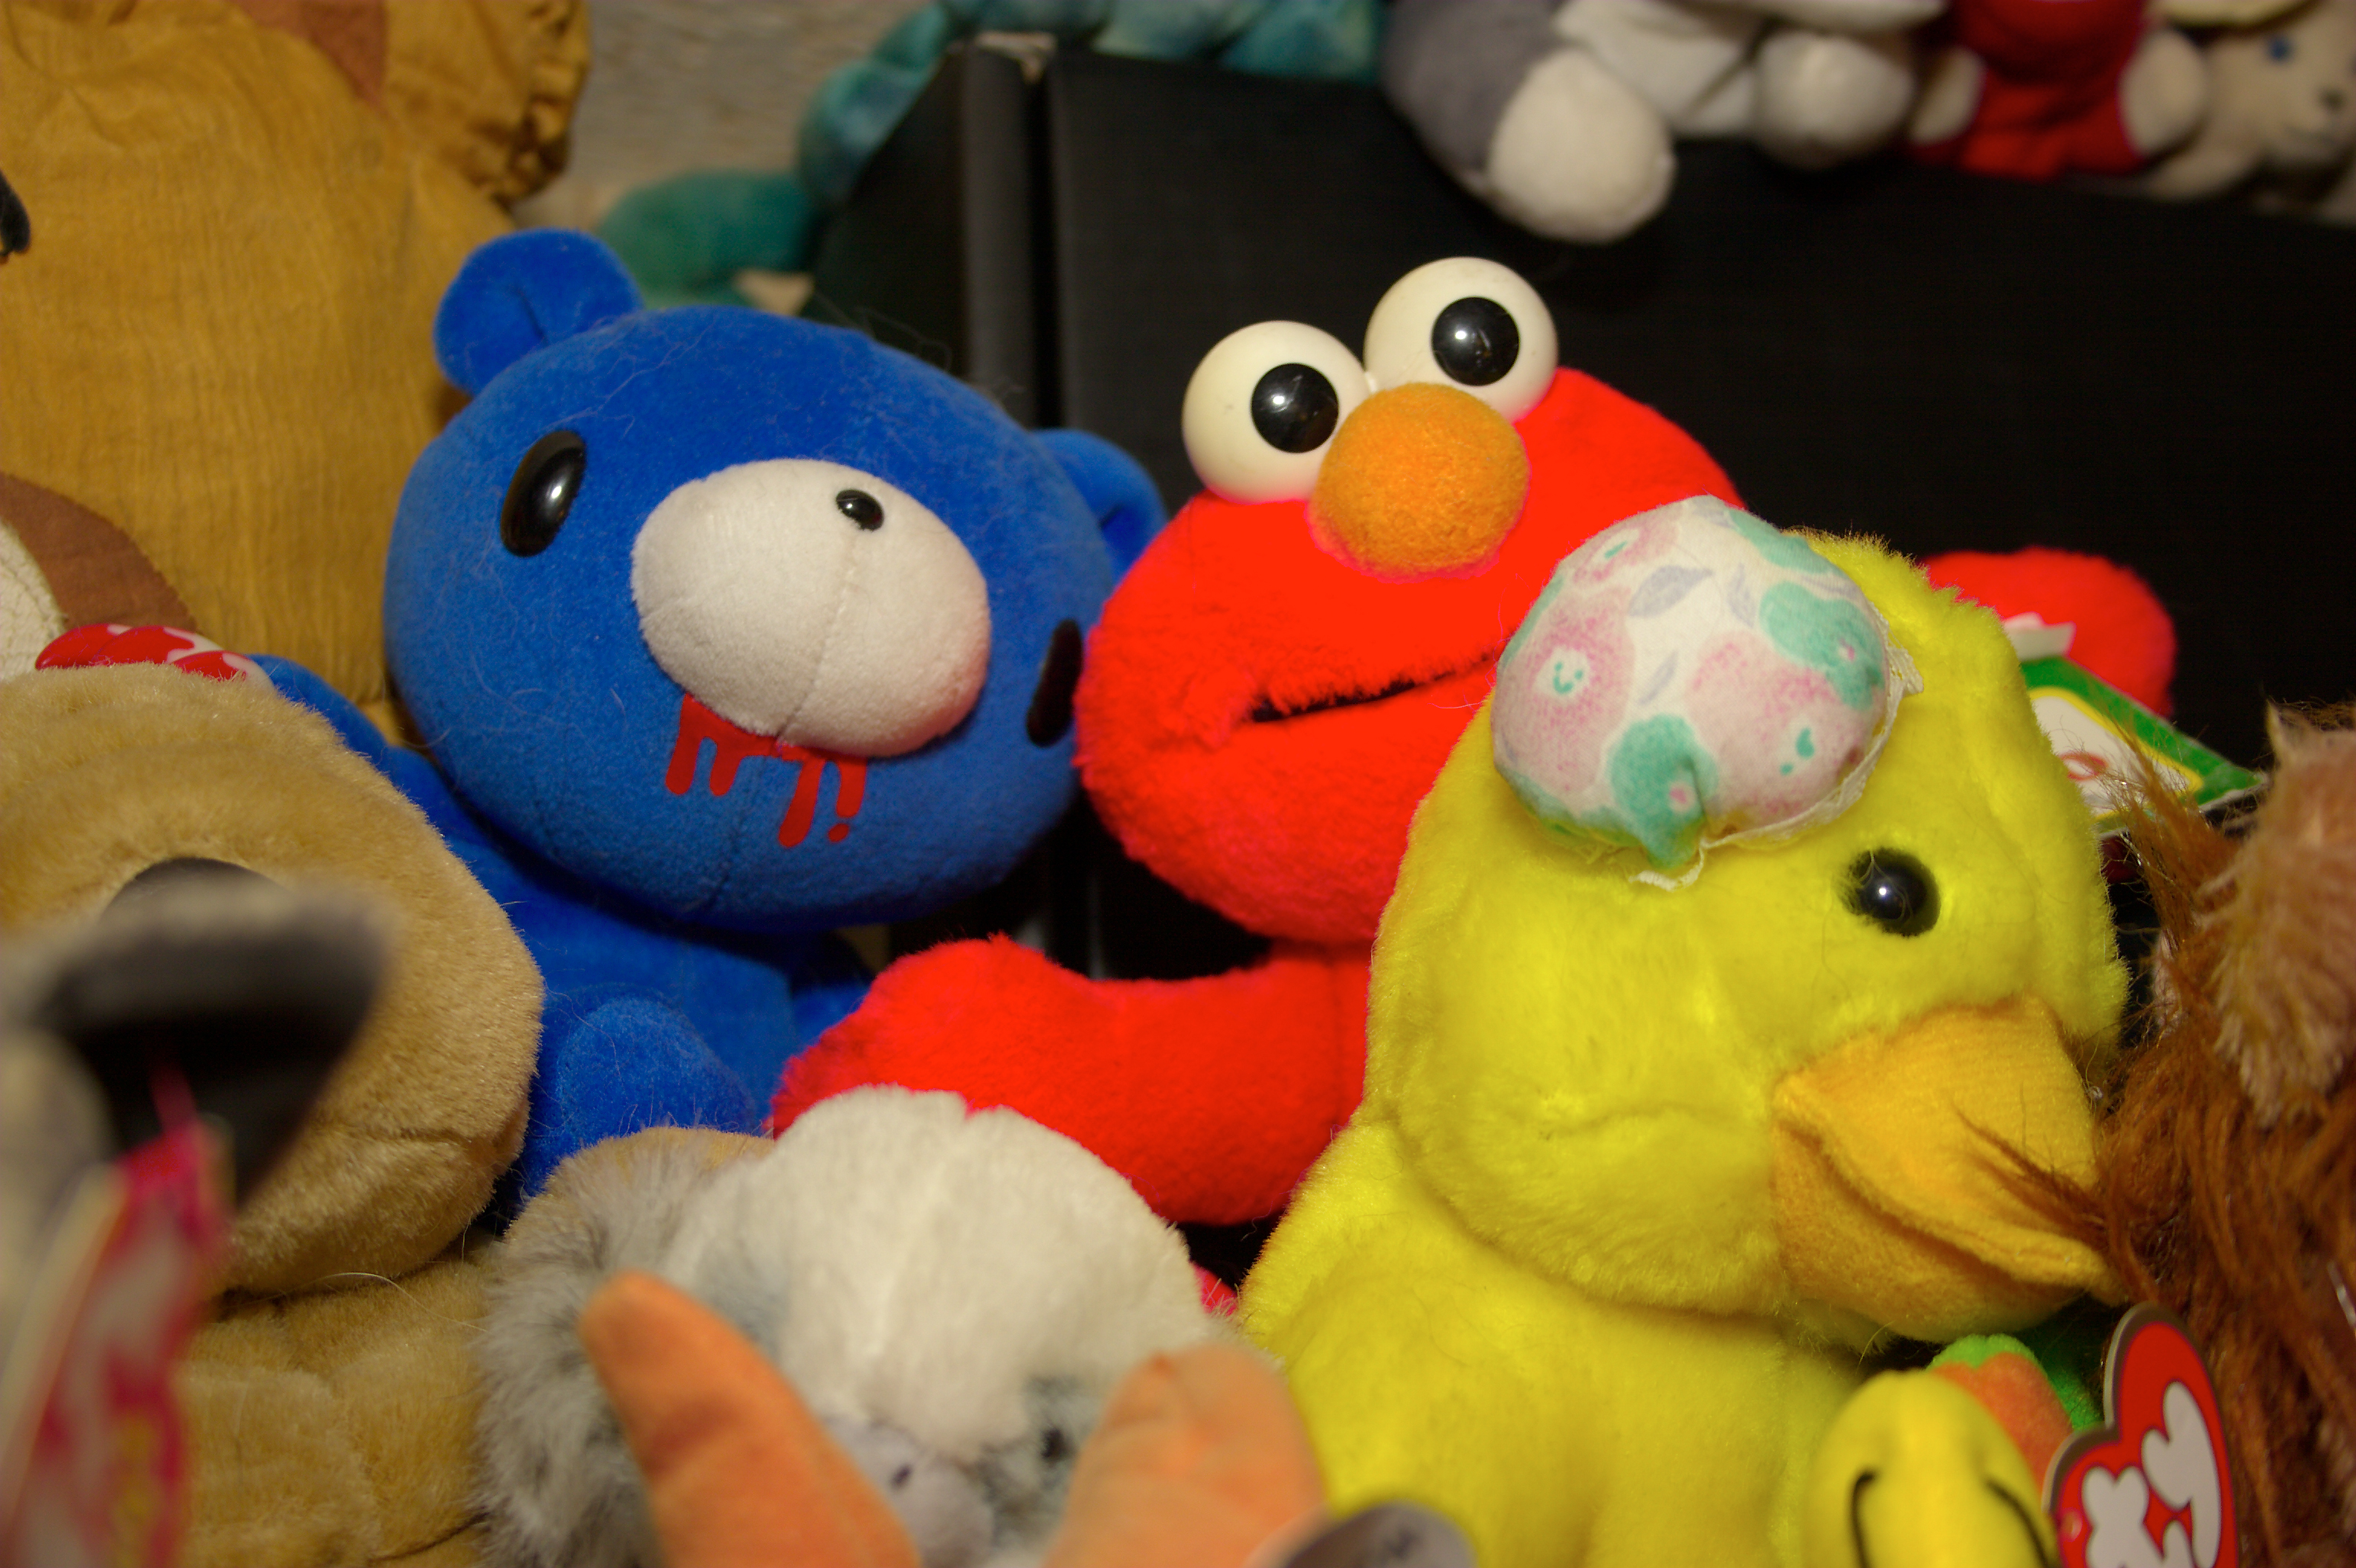
In this test, we're using a nightmare for digital cameras: a flash-lit camera of high-saturation subjects. The big worry here is clarity and blowout. Click any of the images for the full-size original. The original RAW is
here. All photos were converted with the standard methods (Normal Saturation/Sharpening), and no further modification besides the 'Gimme a JPEG' method were applied.
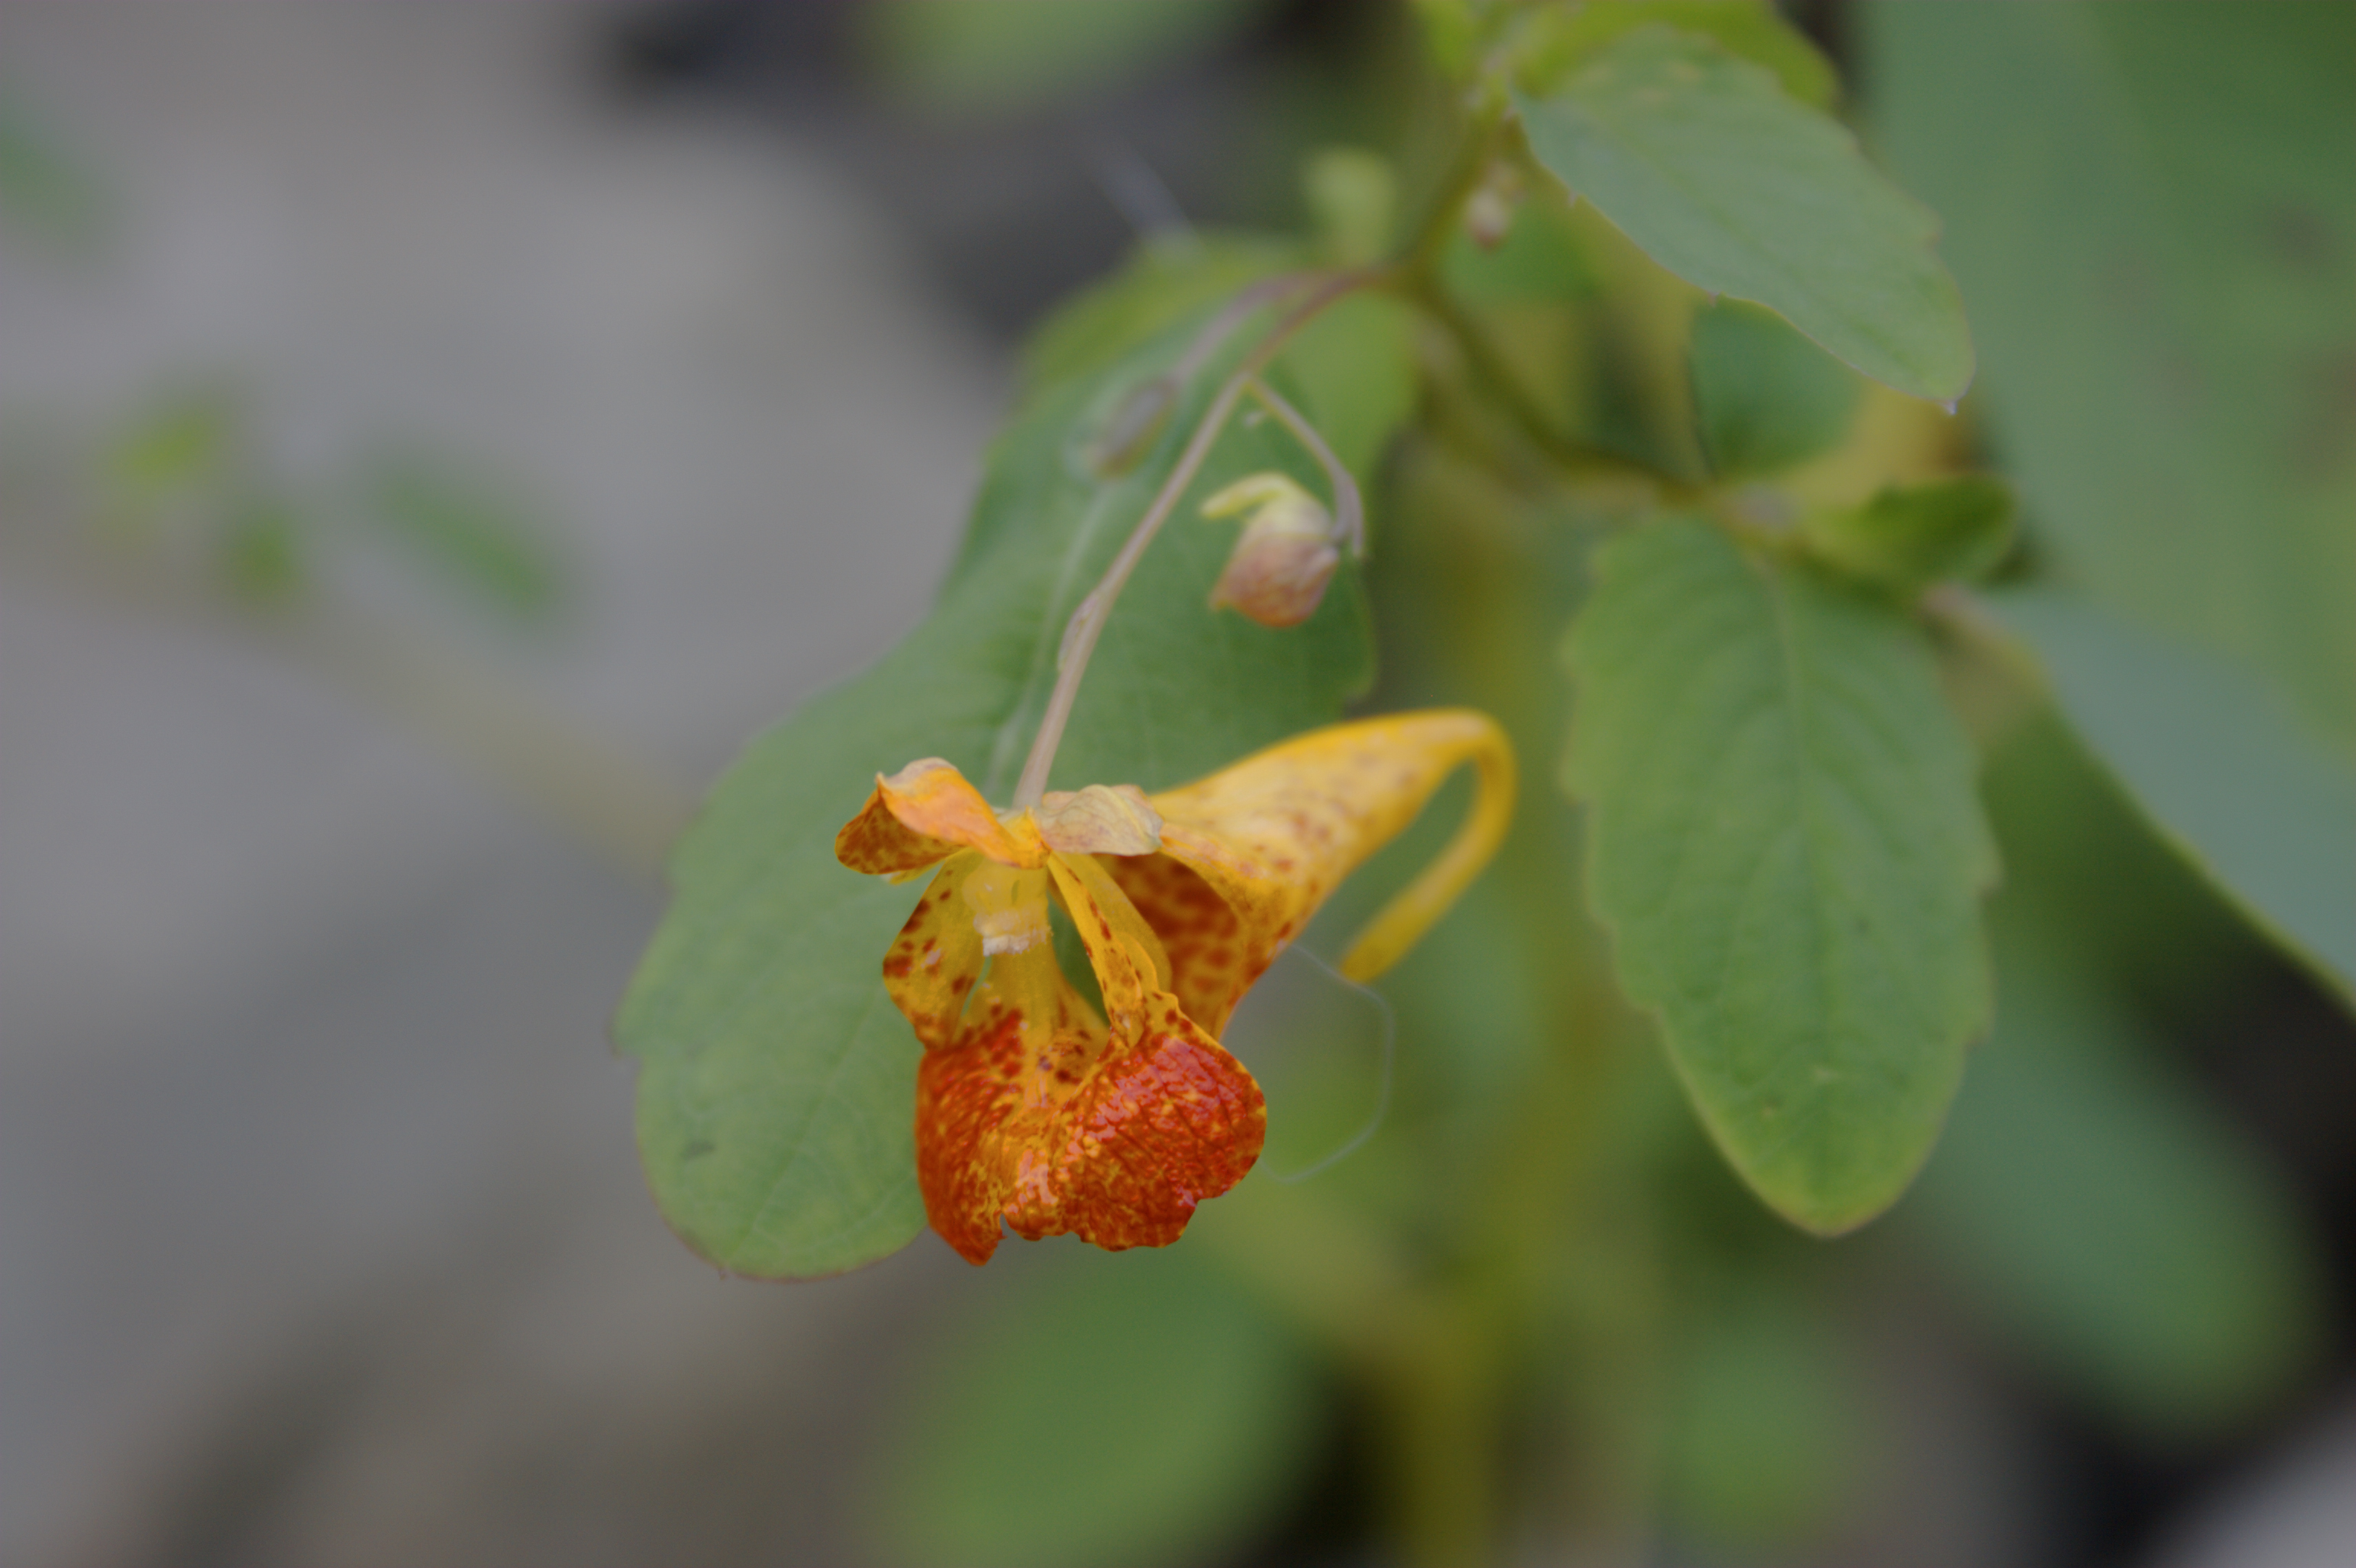
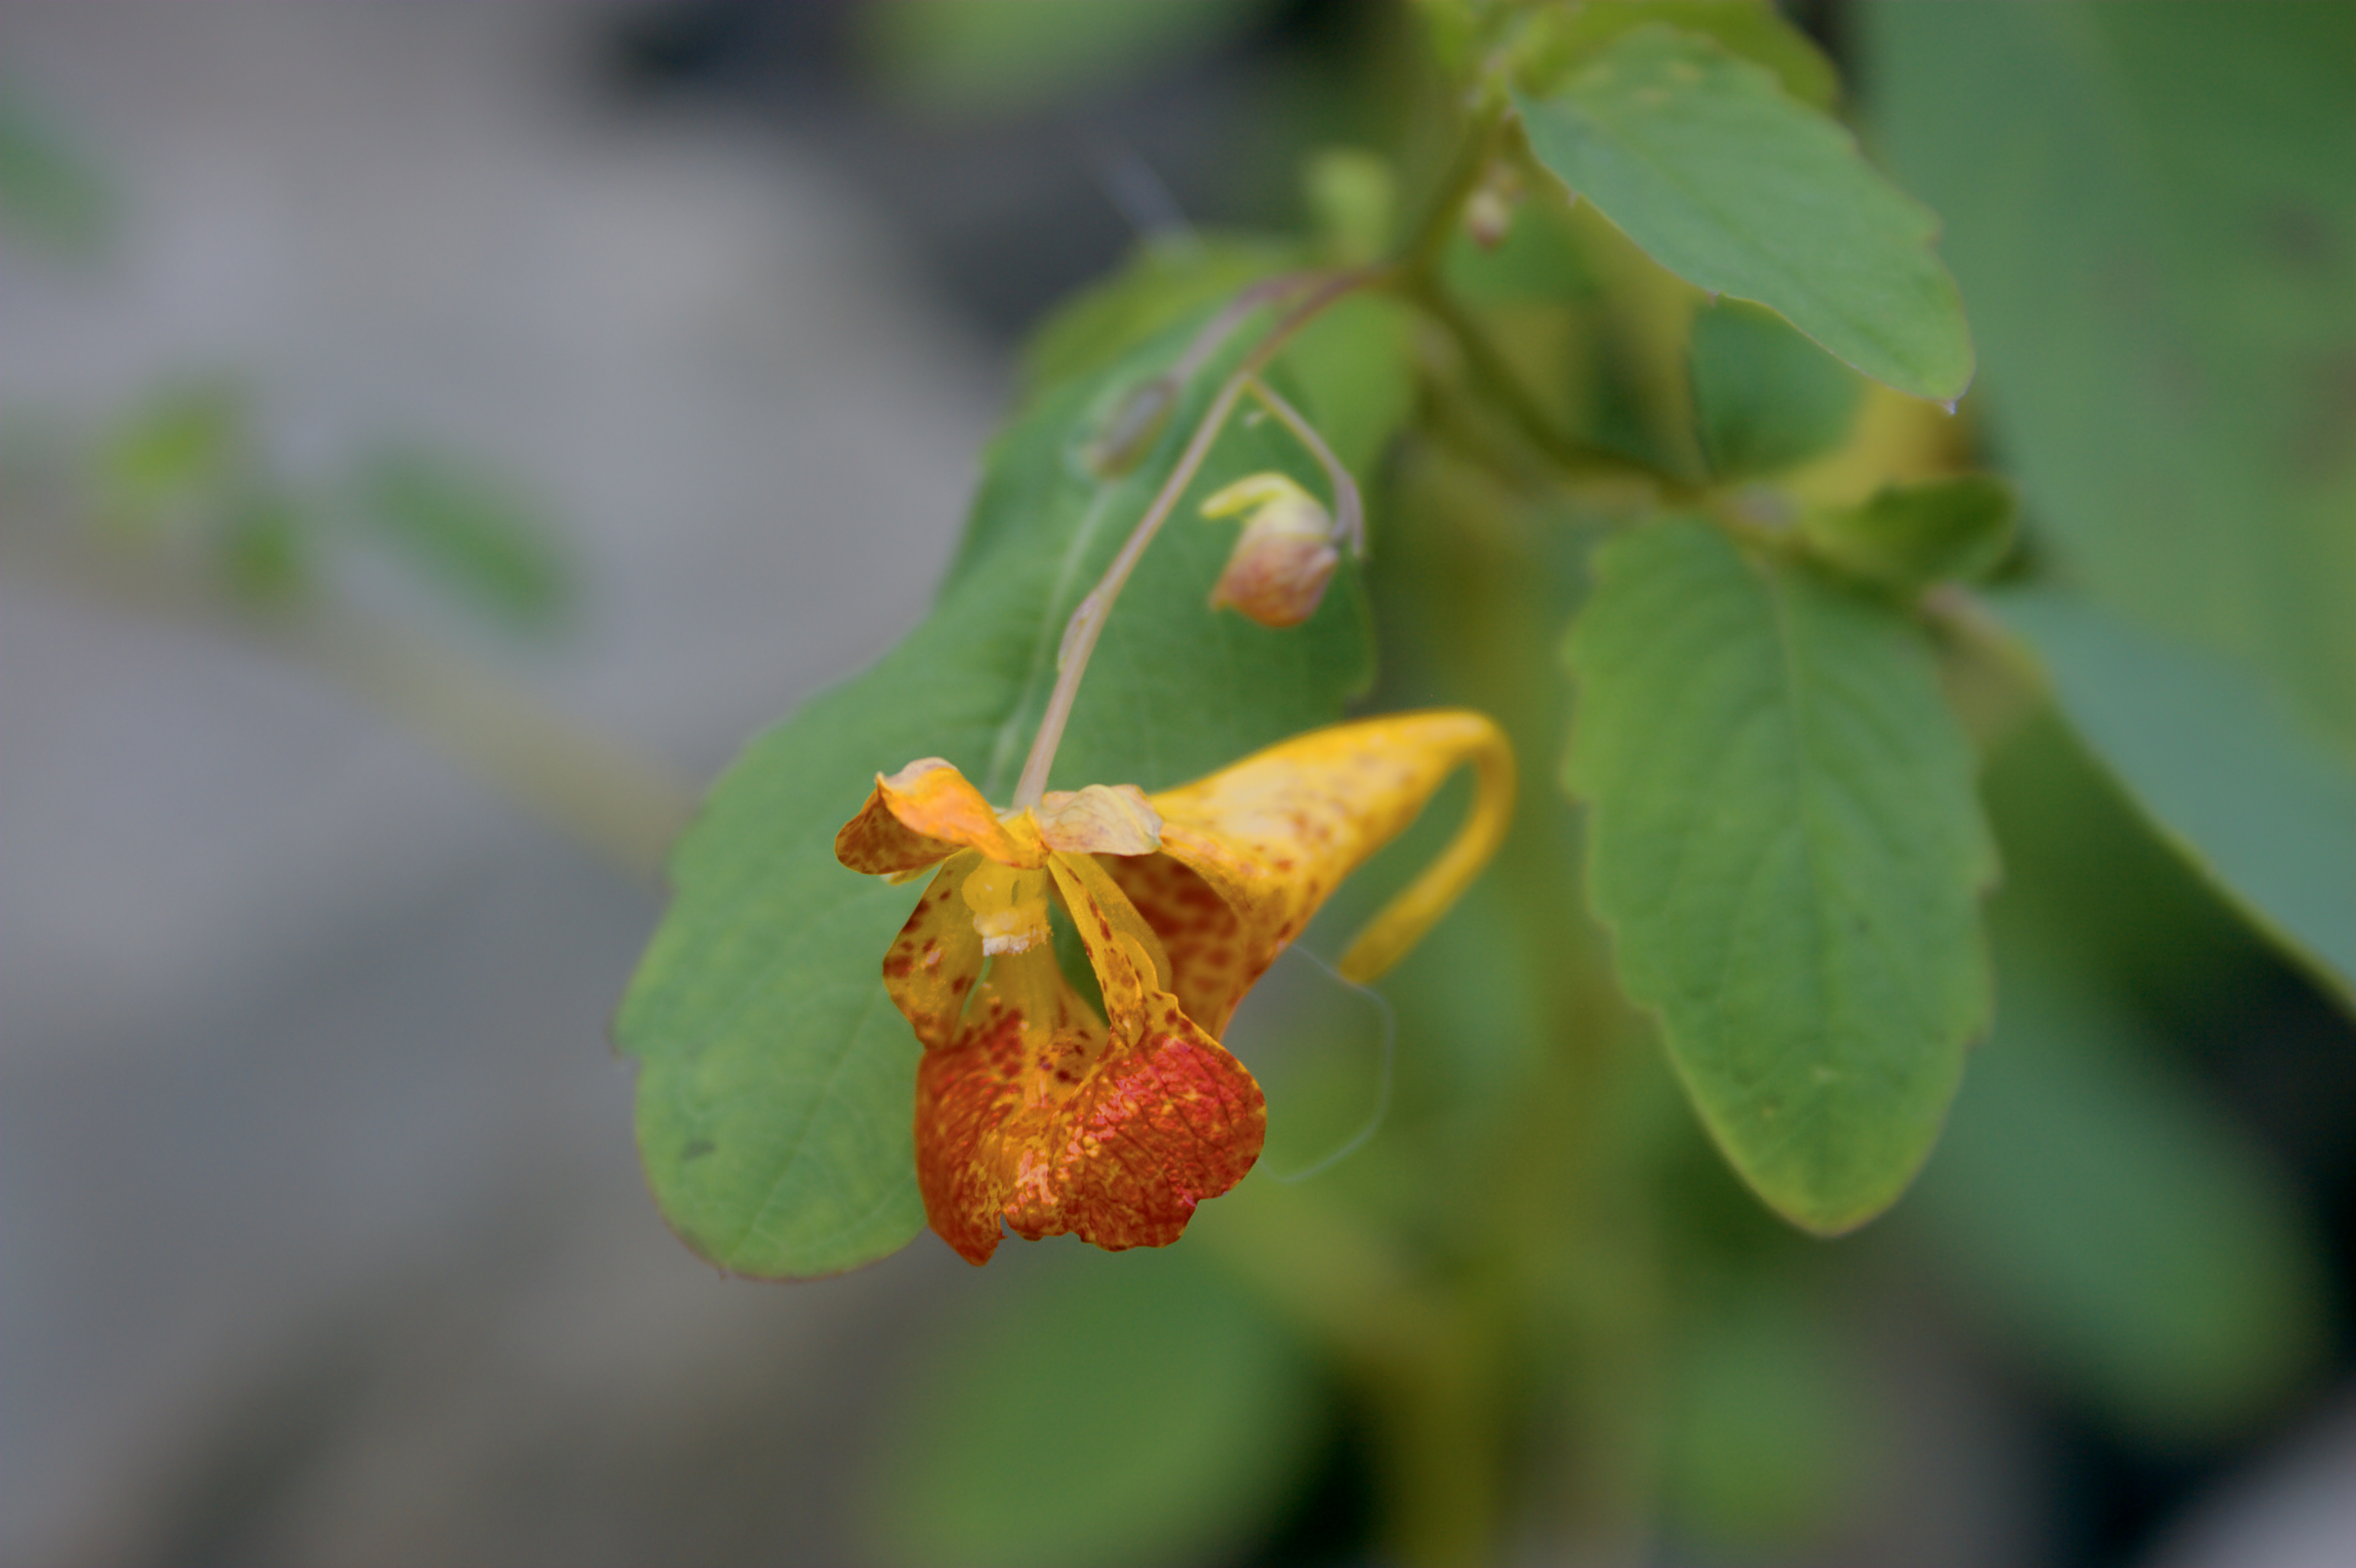
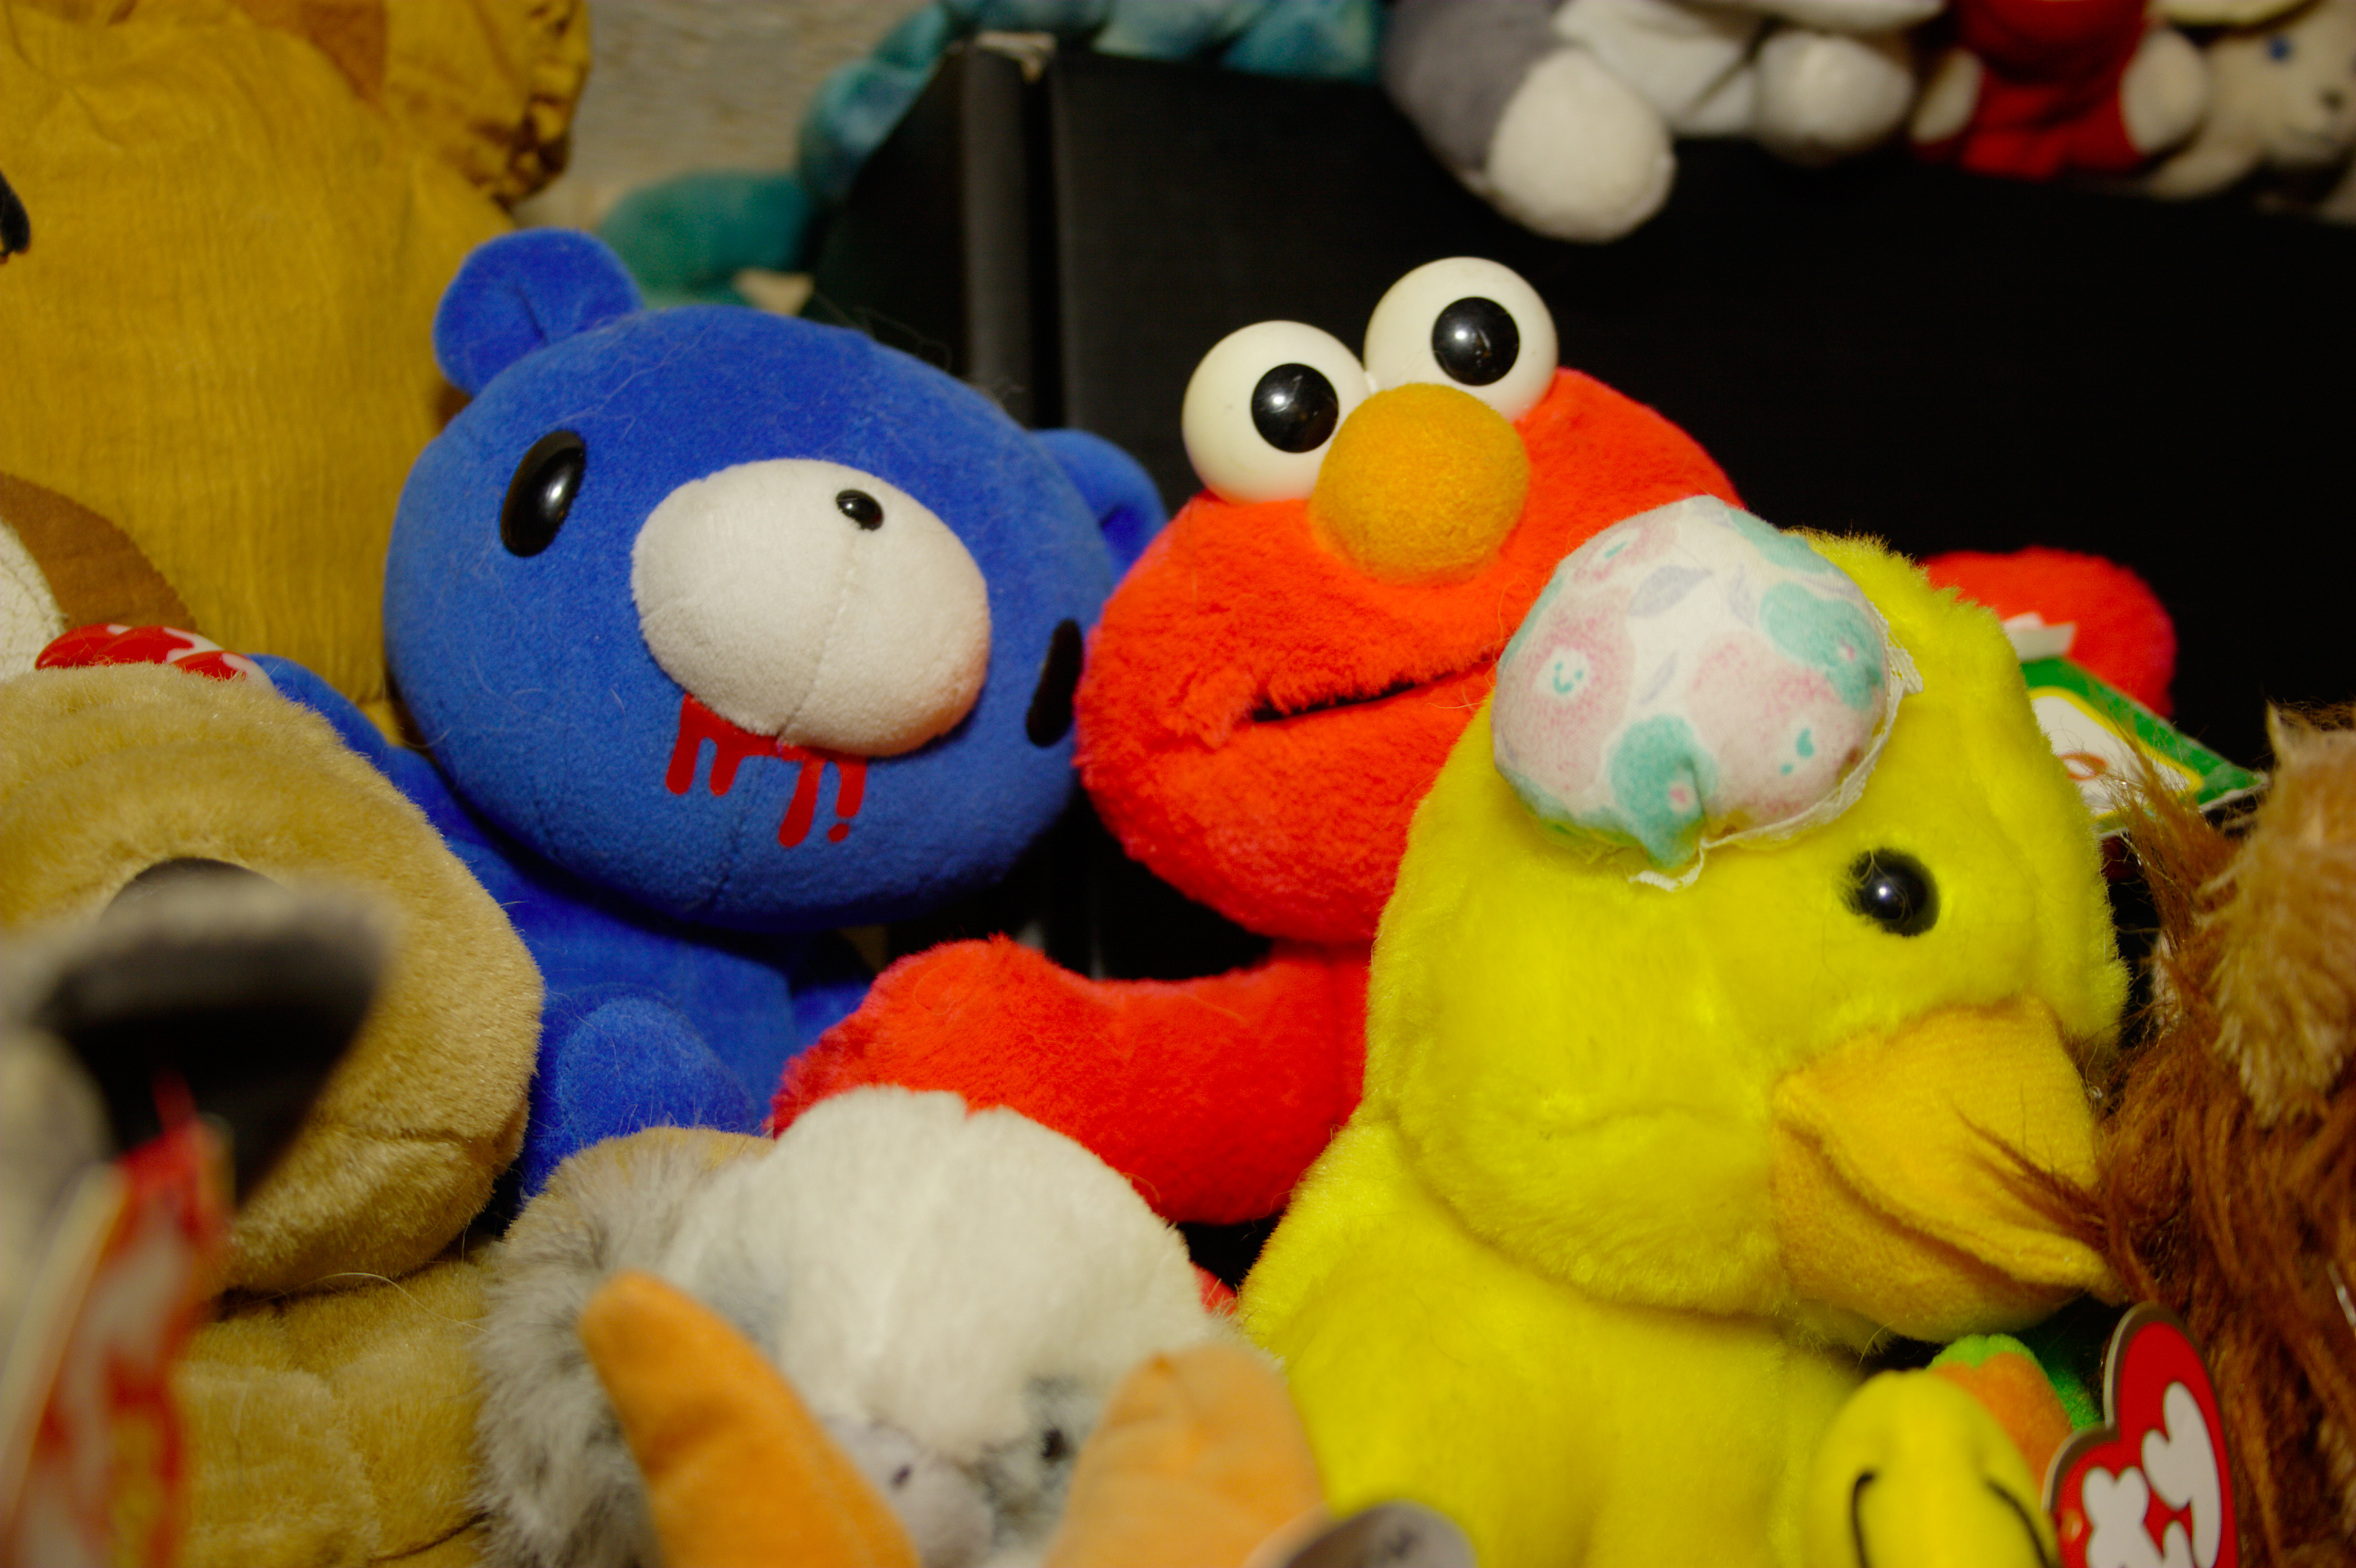
Canon's File Viewer Utility.
Not too bad, if a little undersaturated. Color reproduction is pretty good. We have some slight posterization near elmo's nose, but no lost highlights besides that.
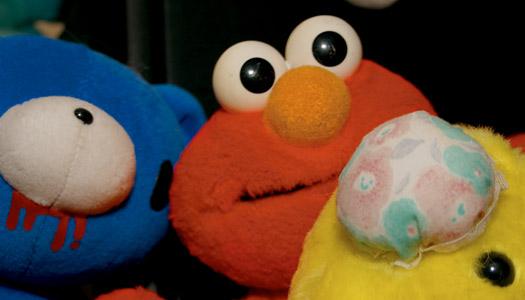
Fred Miranda's LPBatch.
Poor elmo! His face is completely blown out. The blue monster-bear also shows some posterization. Also note the yellow-ish tint to elmo's (white) eyes.

LinearSharpen.
Not as bad as Fred's actions, but there's still significant blowout on elmo's face, and the monster bear's head.

Linear Laundry.
Spot on. Color reproduction is dead-on, whites are white, and we don't have any blow out, even around elmo's nose. The only drawback is that the picture looks a bit darker than the others.
Of the three 'competitors', Canon's File Viewer Utility (FVU) actually did the best job. Let's take a look at it in some other photos.
Down and Dirty: Linear Laundry vs Canon's File Viewer Utility
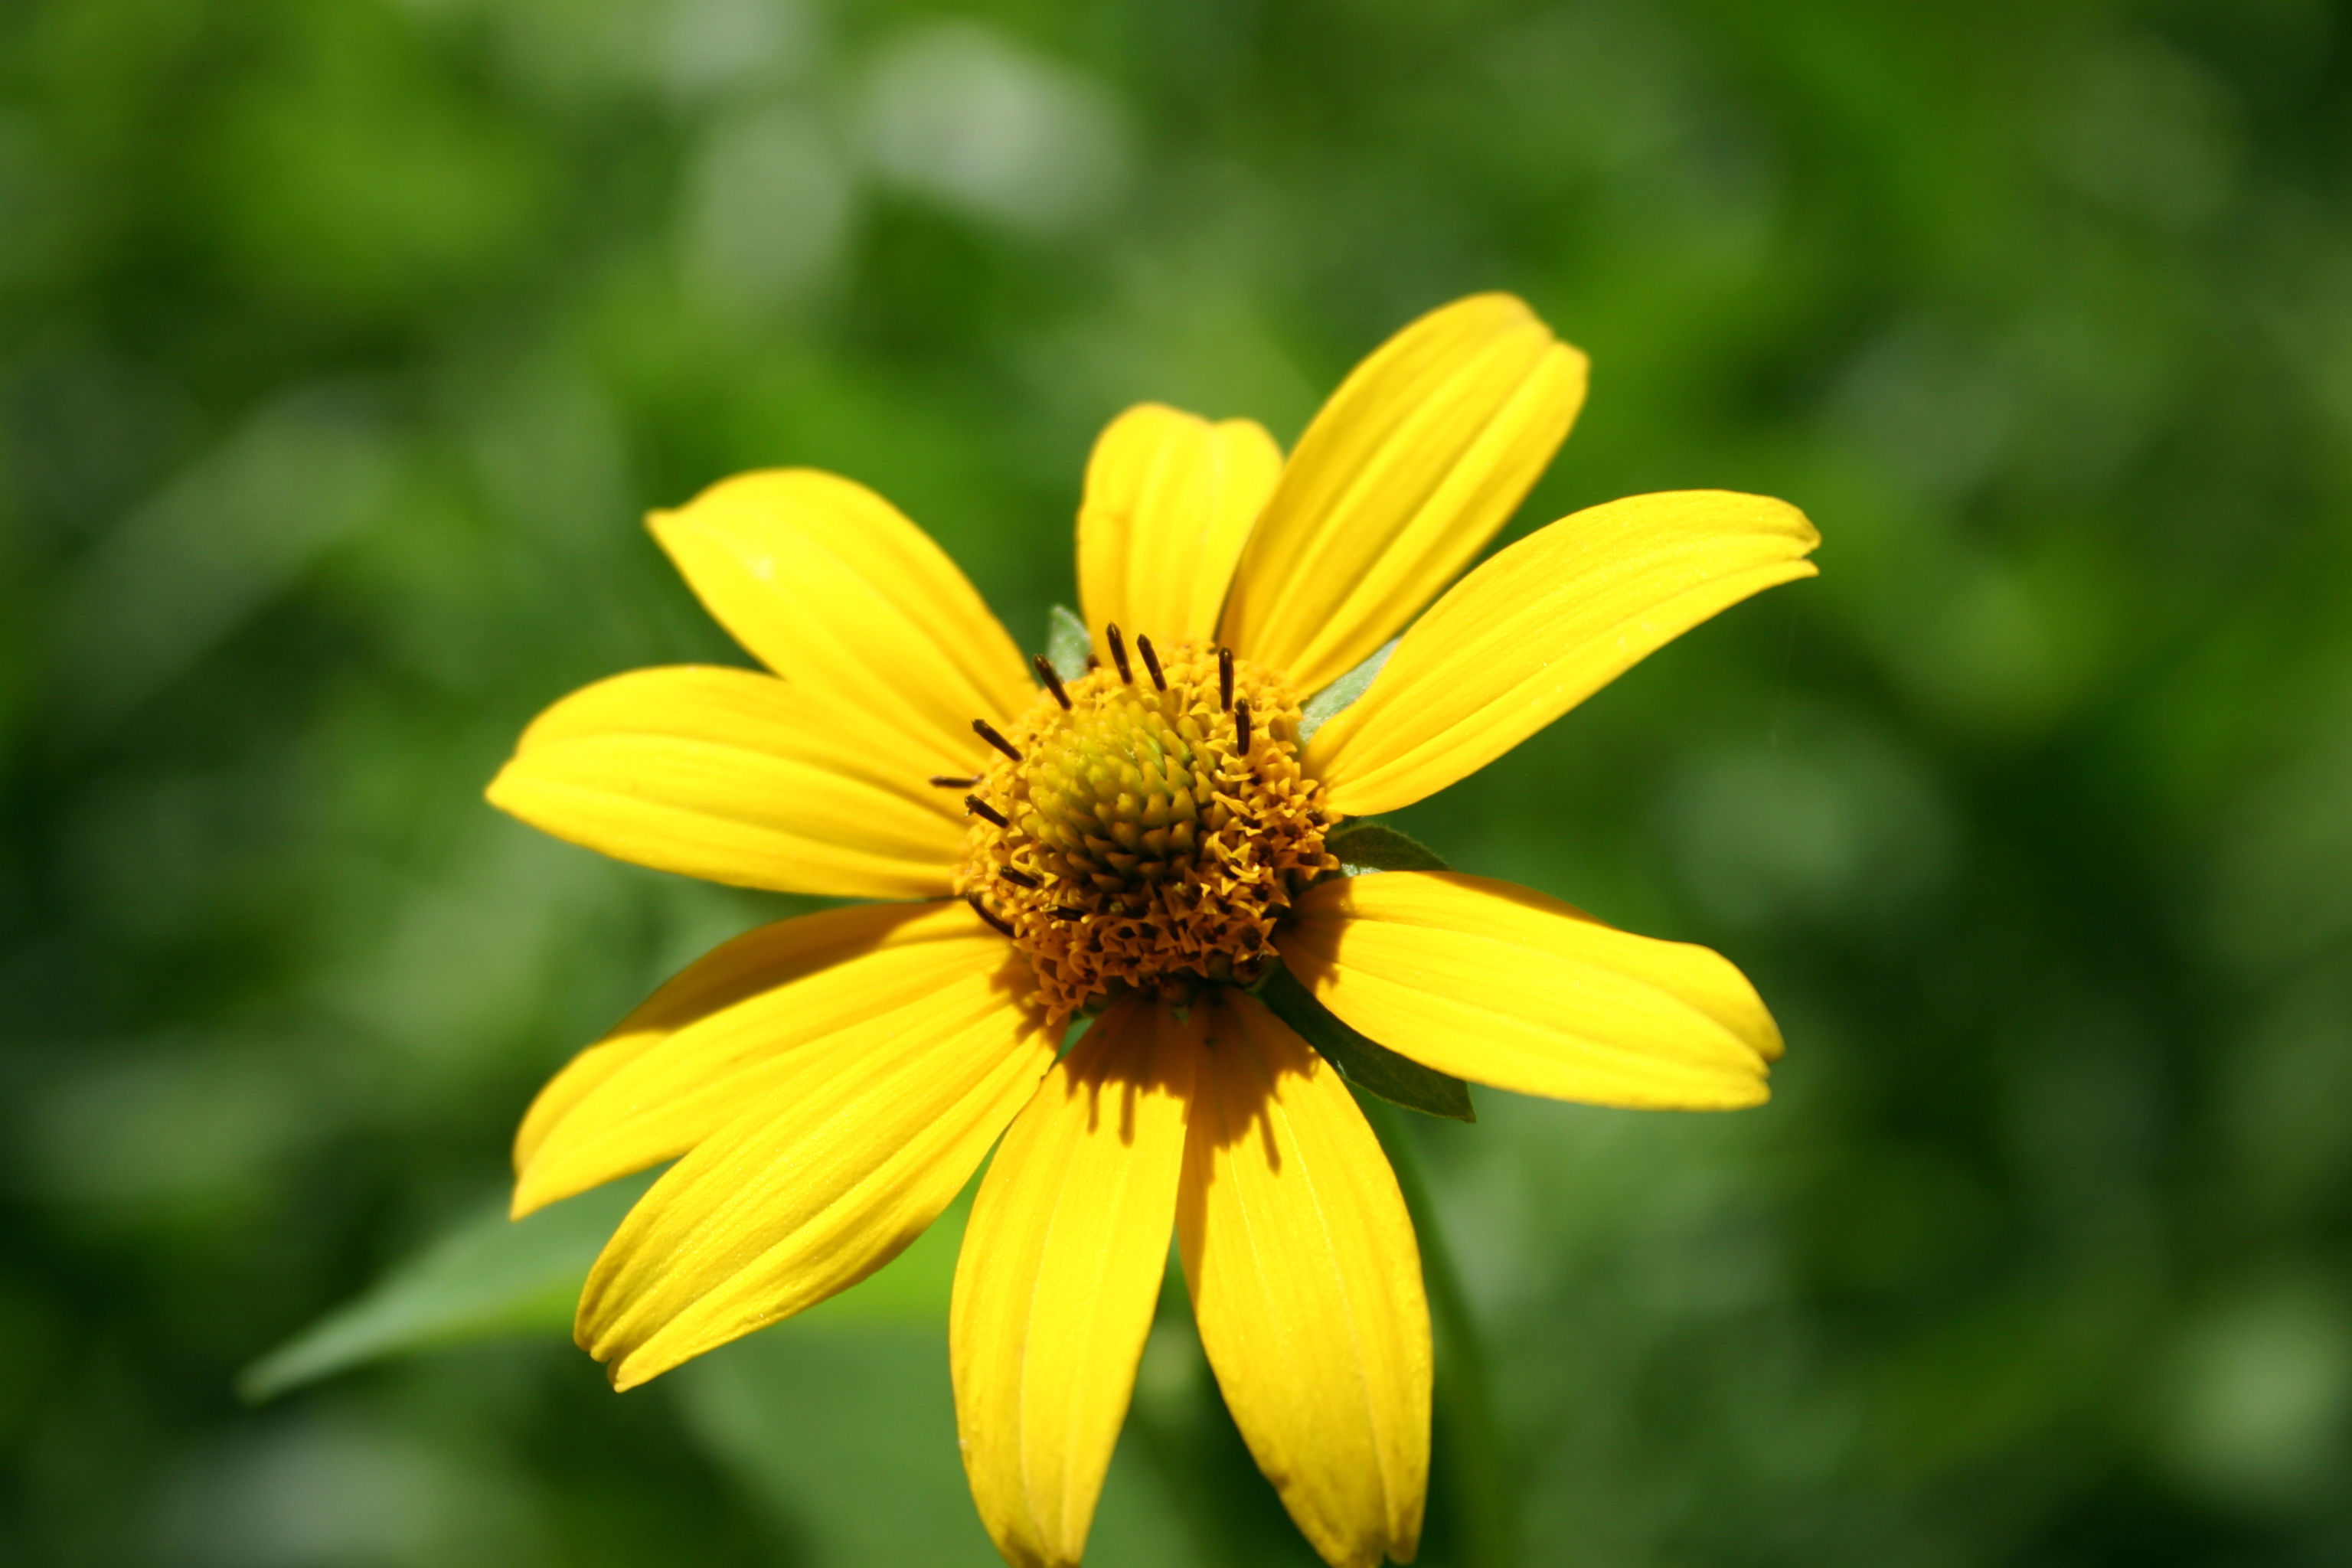
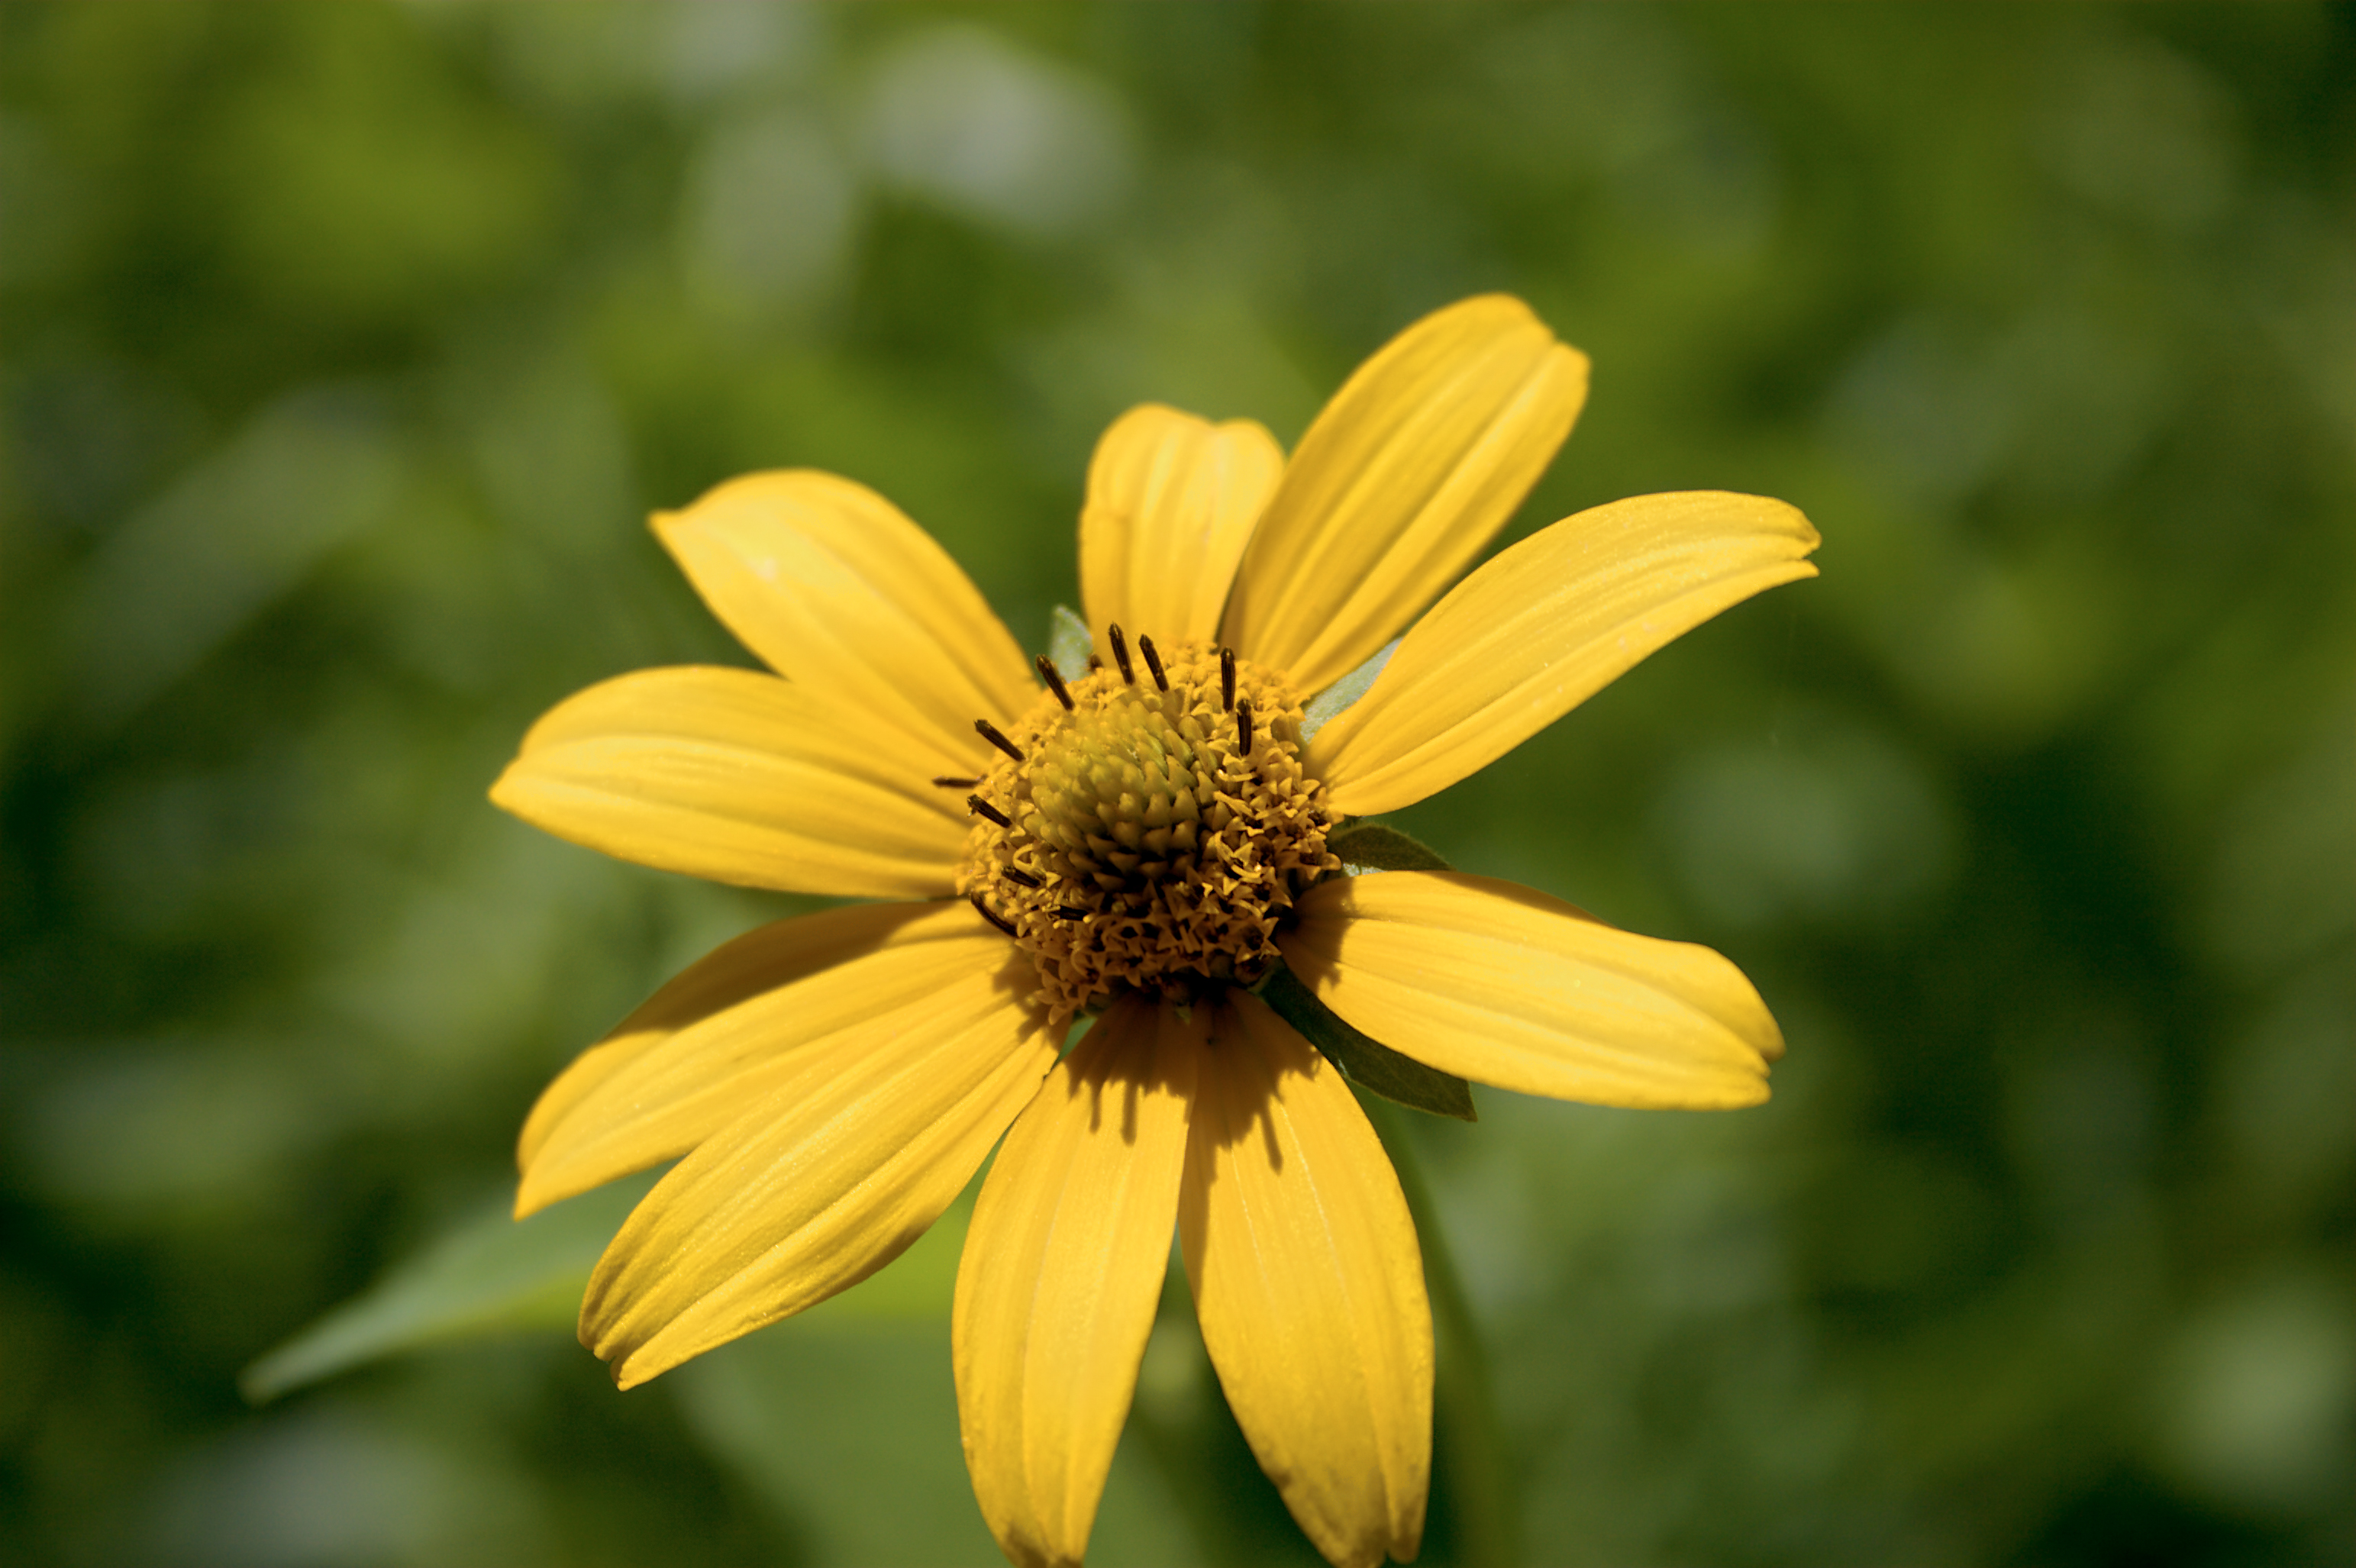
Yellow Flower on Dark Green original RAW
Yellow flower blow-outs were a particular peeve of mine, and Linear Laundry does a decent job of them. Notice the petals toward the back of the picture - in the Linear Laundry version, you can see the texture. In the Canon FVU photo, it's gone. Again, the Linear Laundry version is slightly darker, and the flower is slightly more red. (This is closer to its actual color).
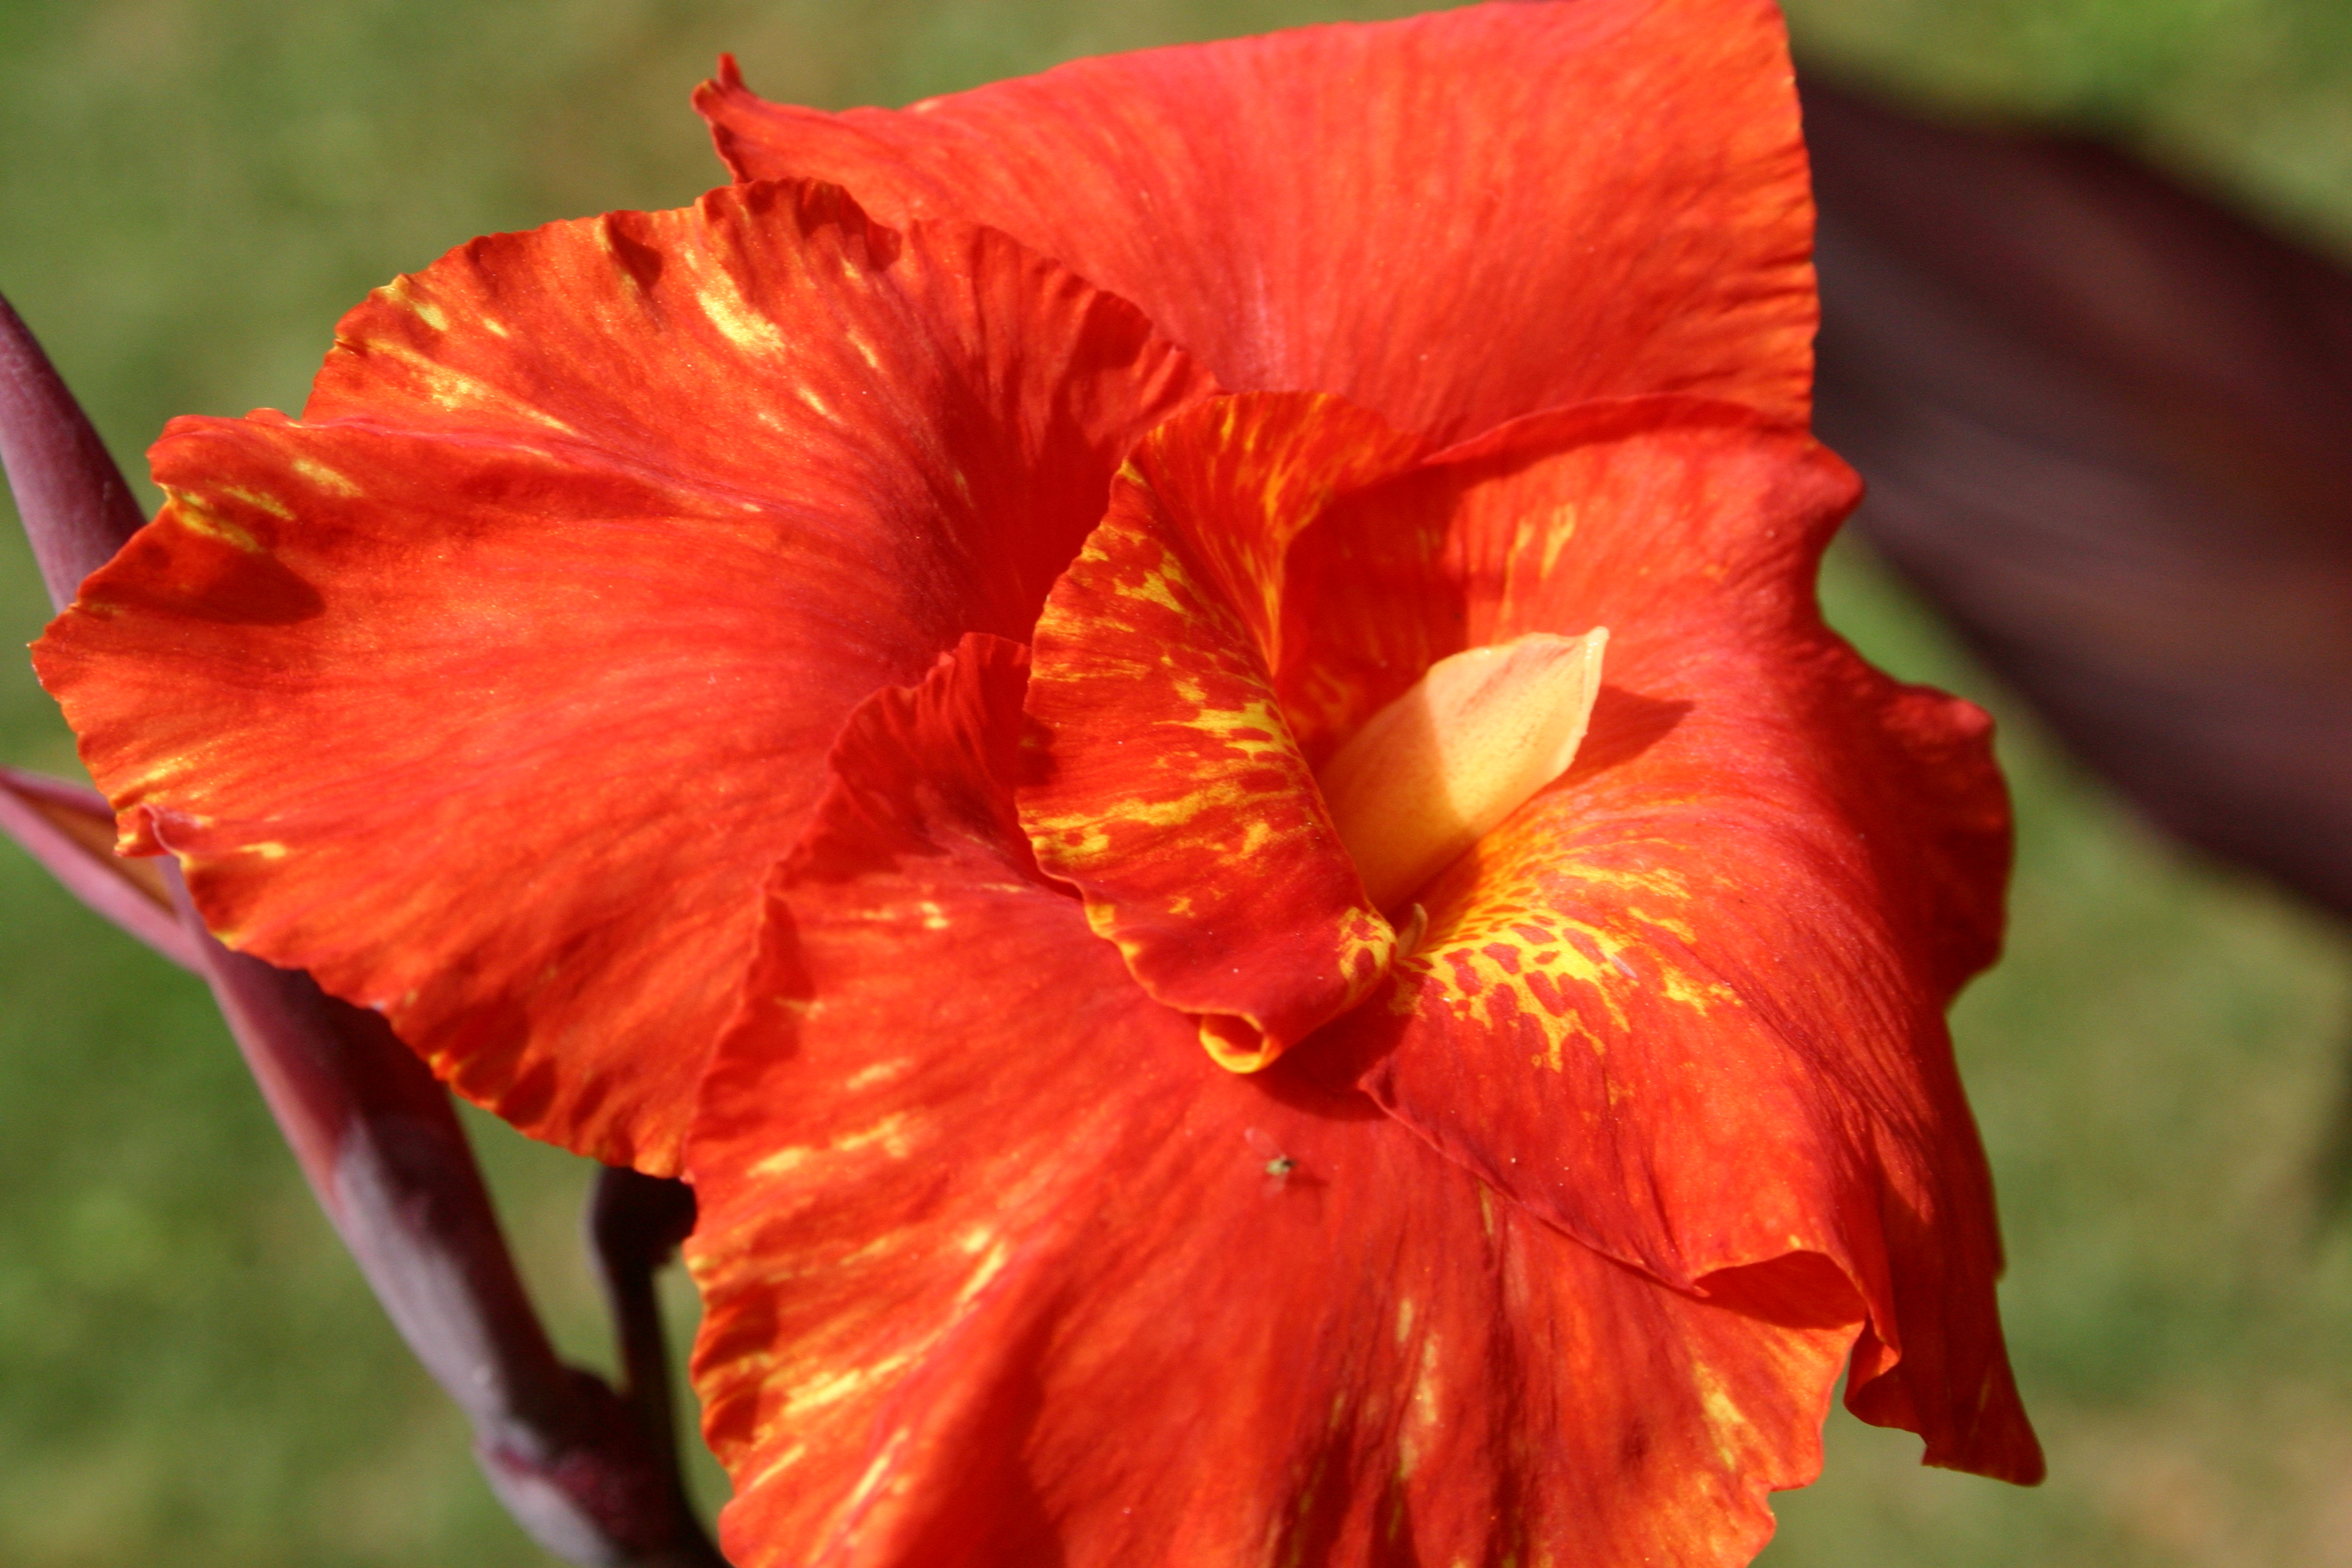
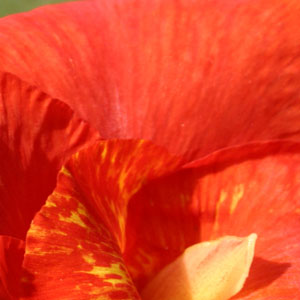
FVU on the Left, Linear Laundry is on the Right.


Posterization and blowout is very apparent in the FVU version of this flower. Given how red it truly is, it makes sense that we're pushing the edges of the color palette. But Linear Laundry preserves much more of the flower texture and shape.

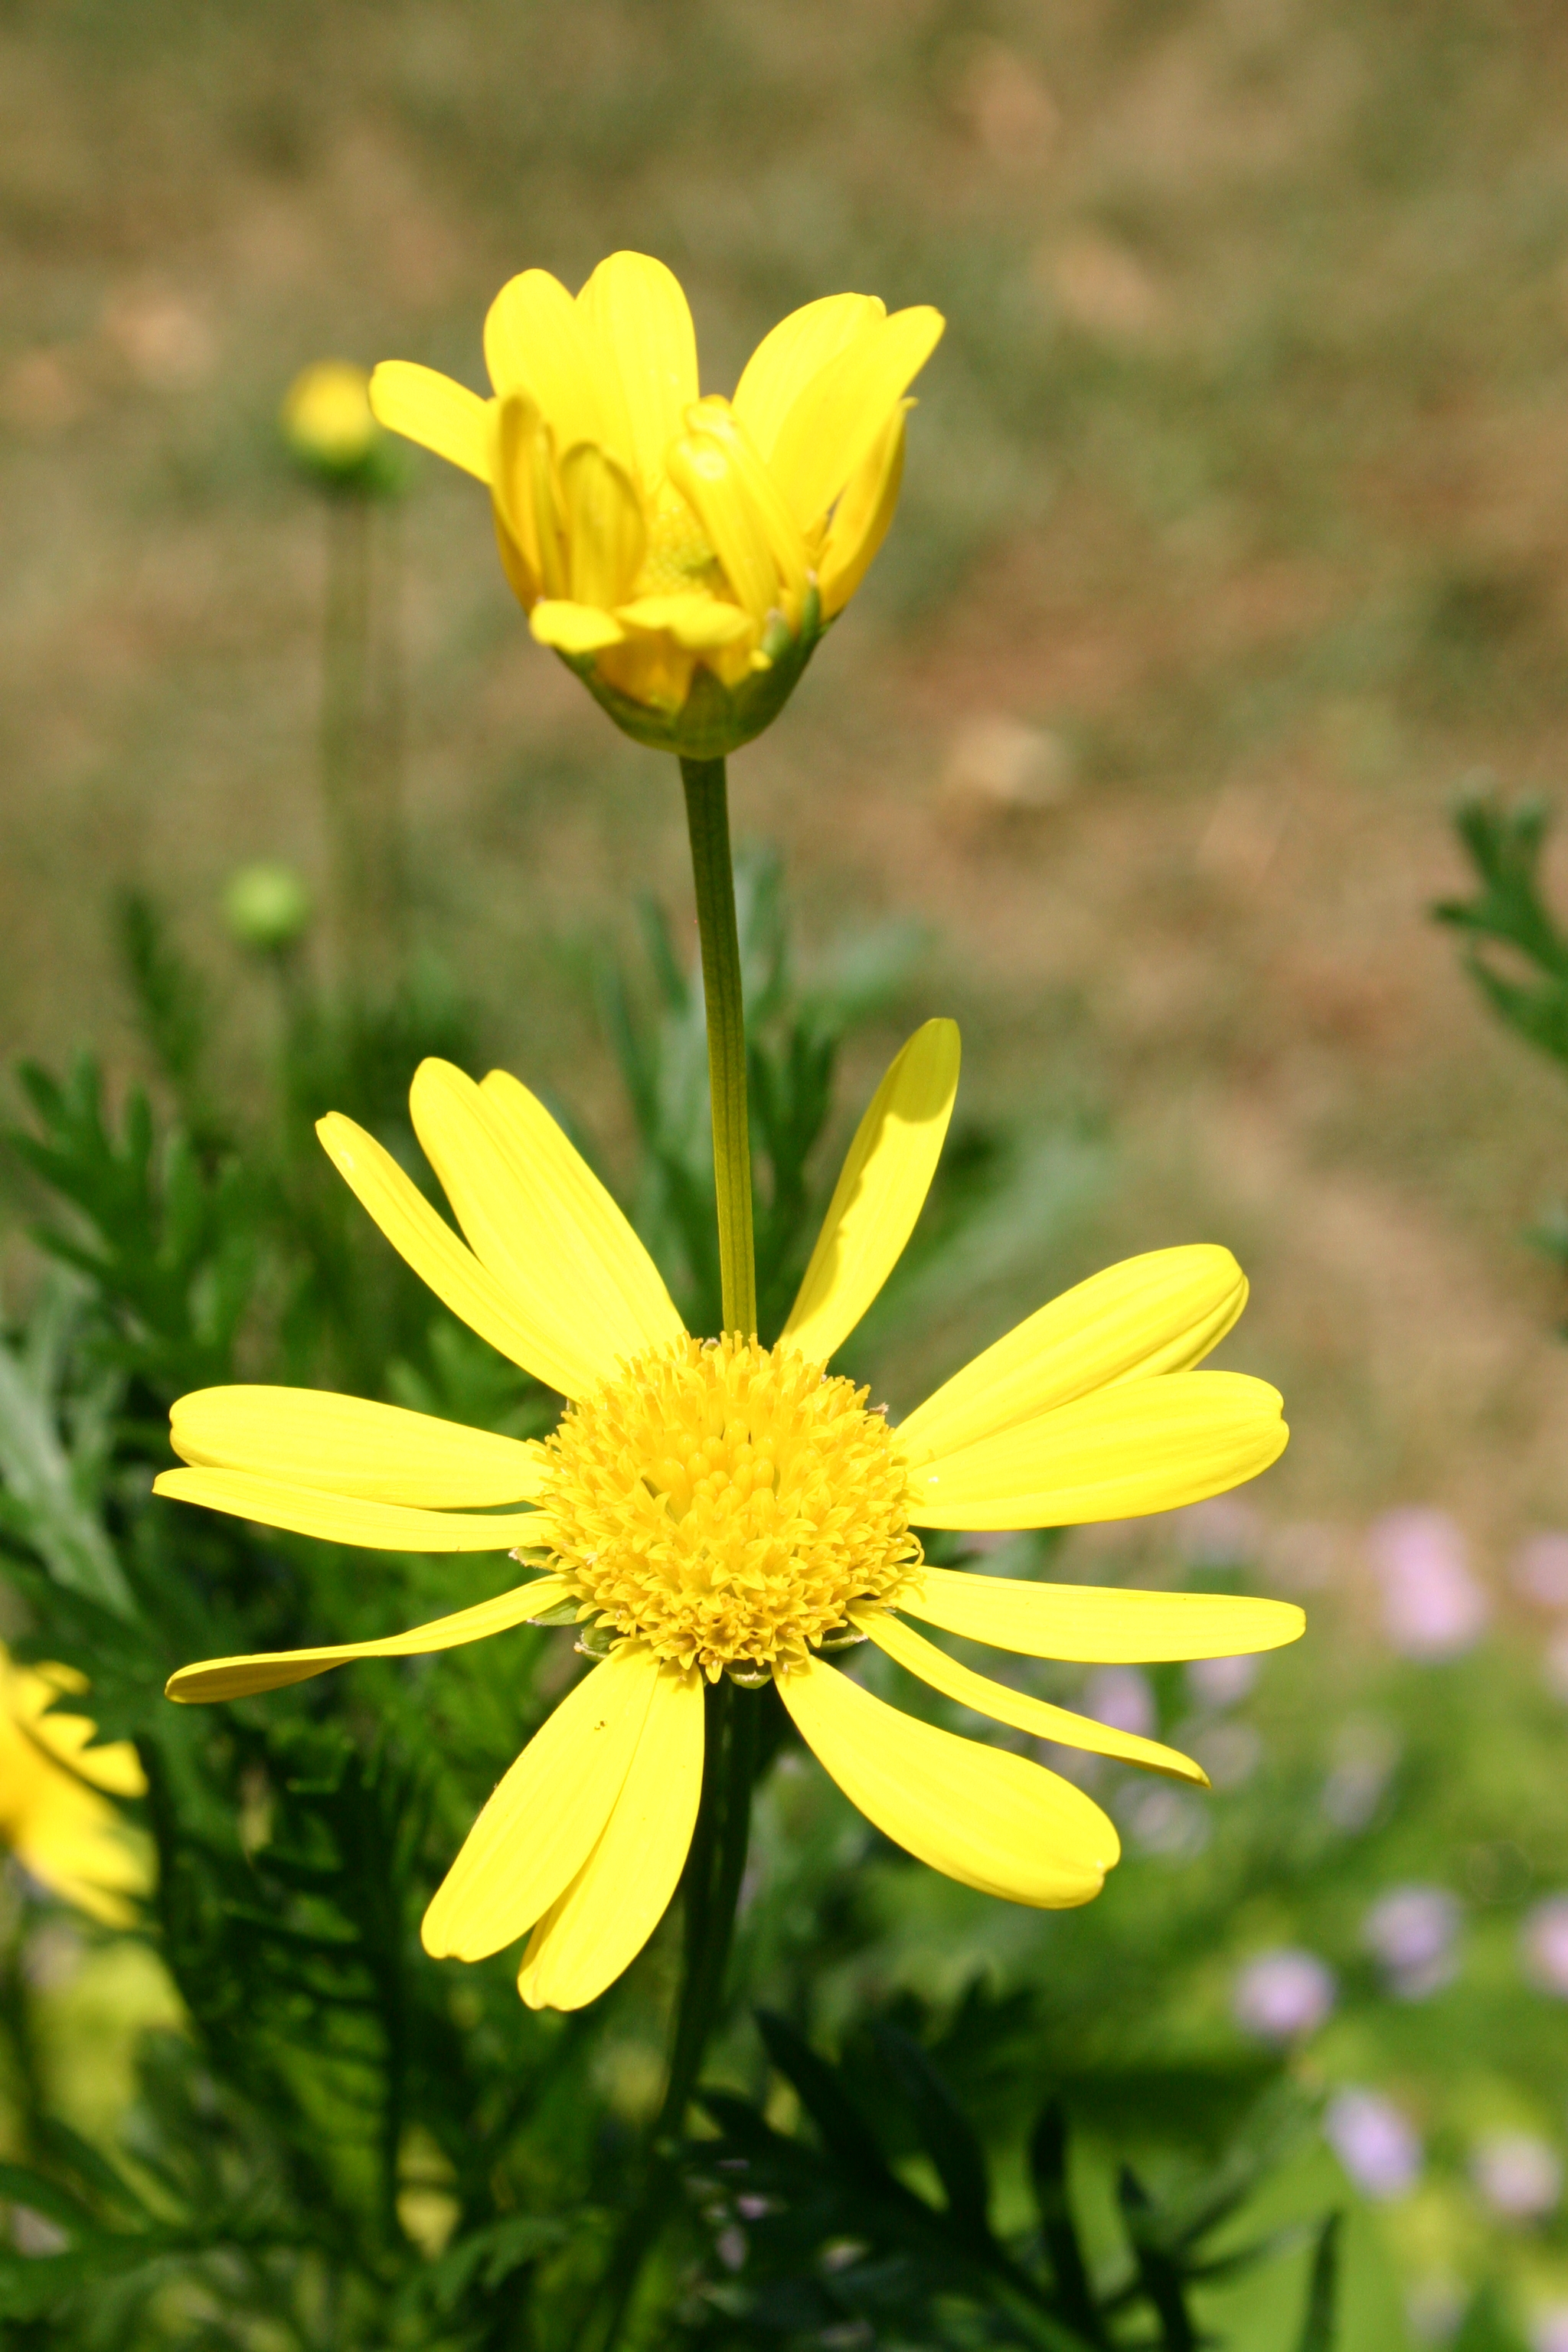
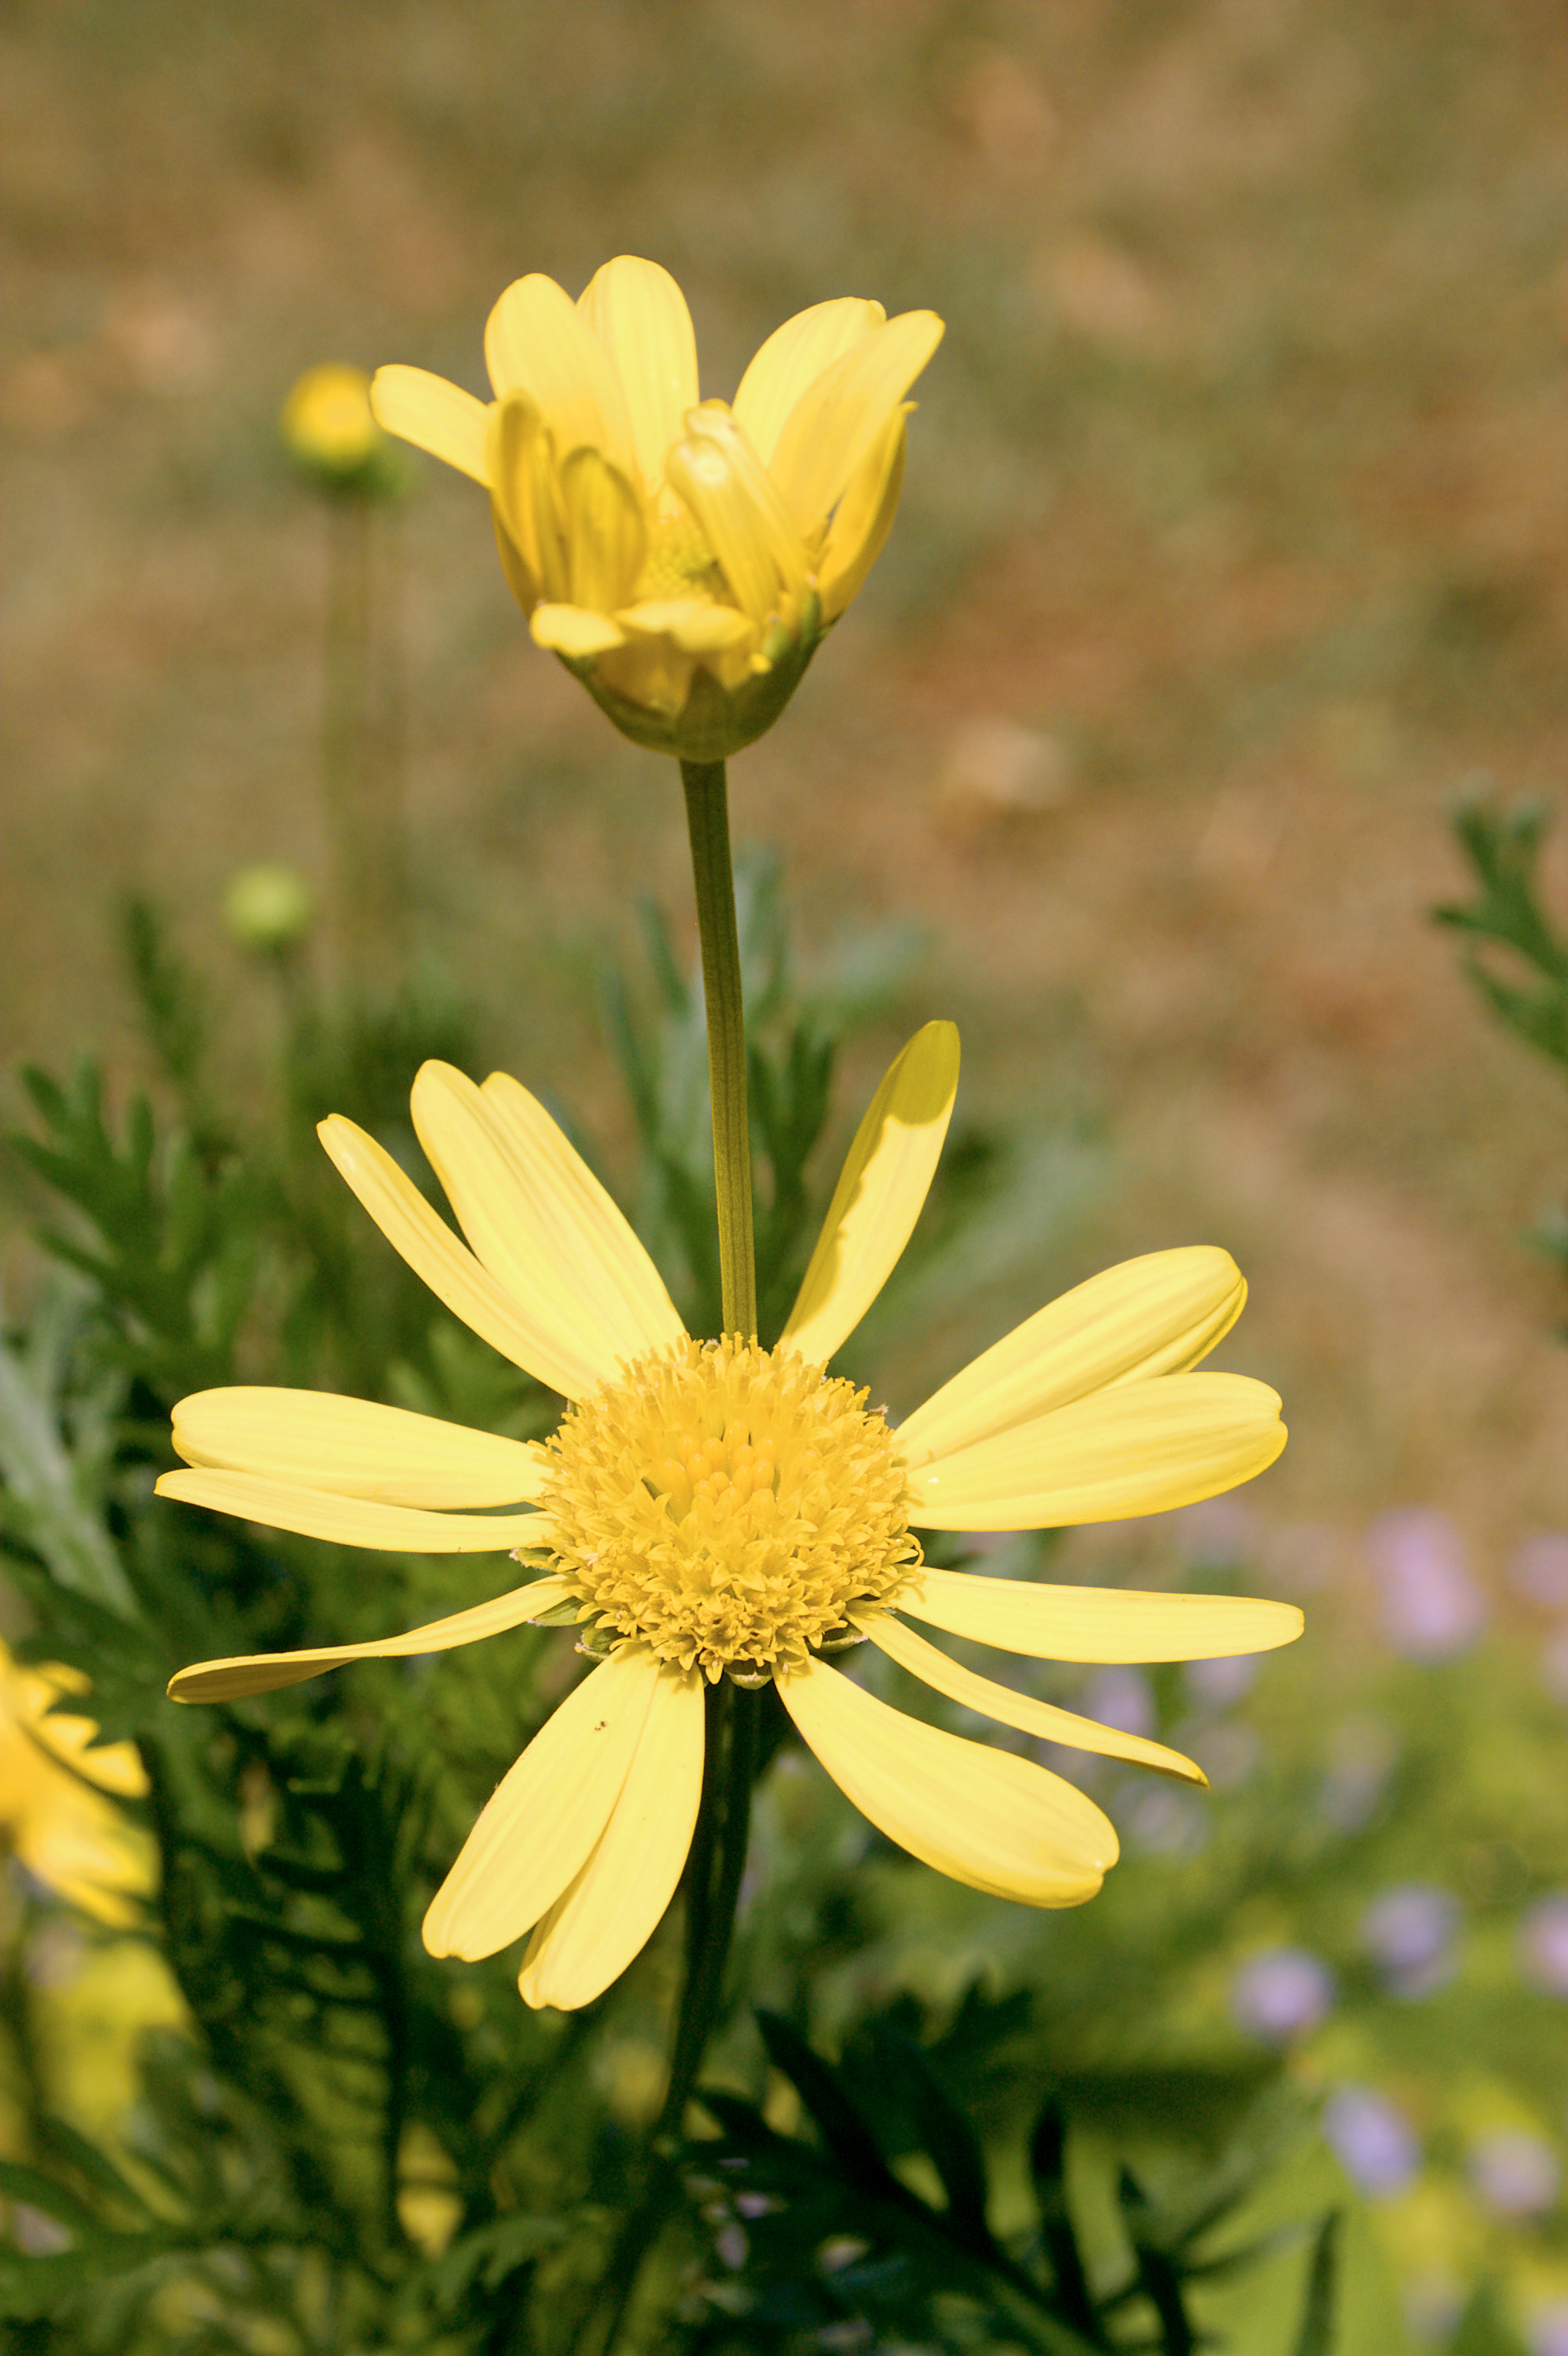
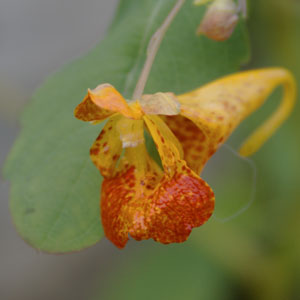
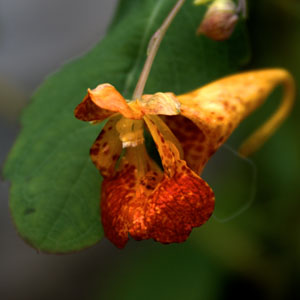
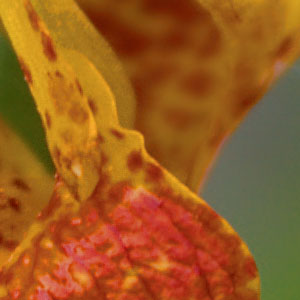
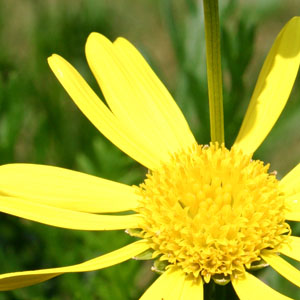
Yellow Flower on Light Brown original RAW
Another yellow flower that really shows the difference well. The blown-out petals are obvious on the FVU version, but notice that the center of the flower is also bright yellow in the FVU version, but slightly orange in the Linear Laundry version. The Linear Laundry version is more true to life. The other obvious difference is the saturation of the background. The FVU version appears fairly washed out compared to the Linear Laundry copy.

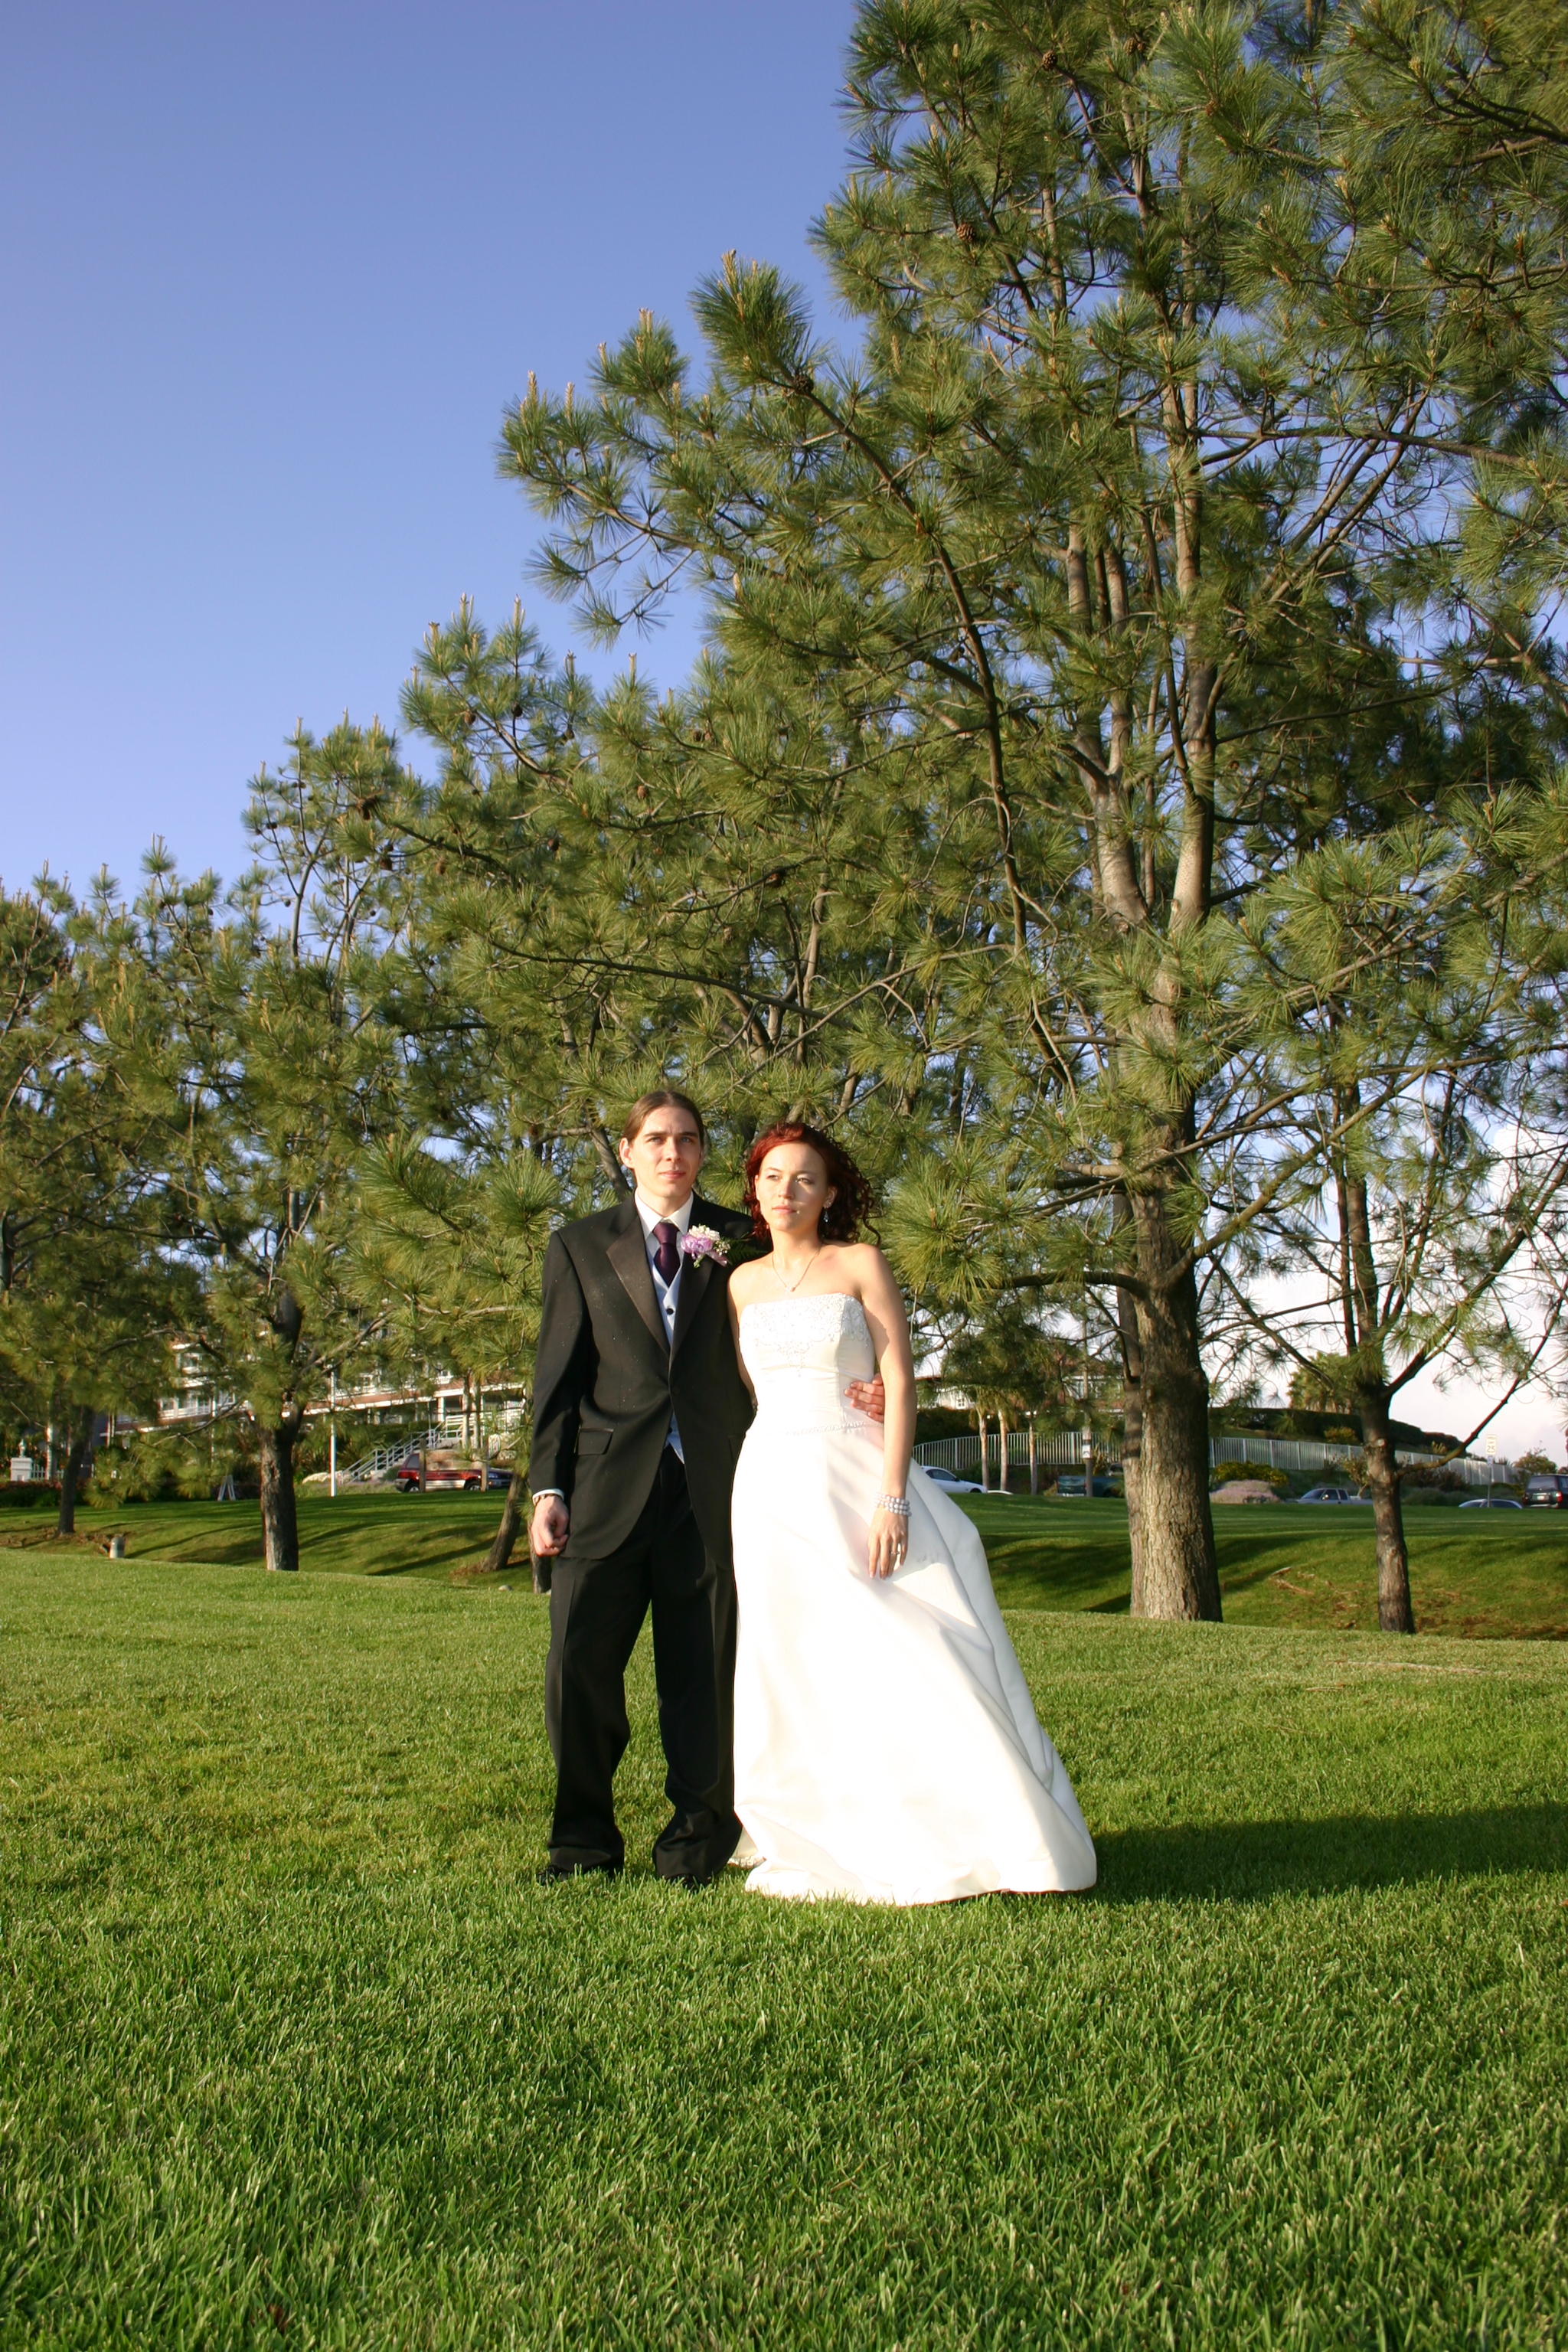
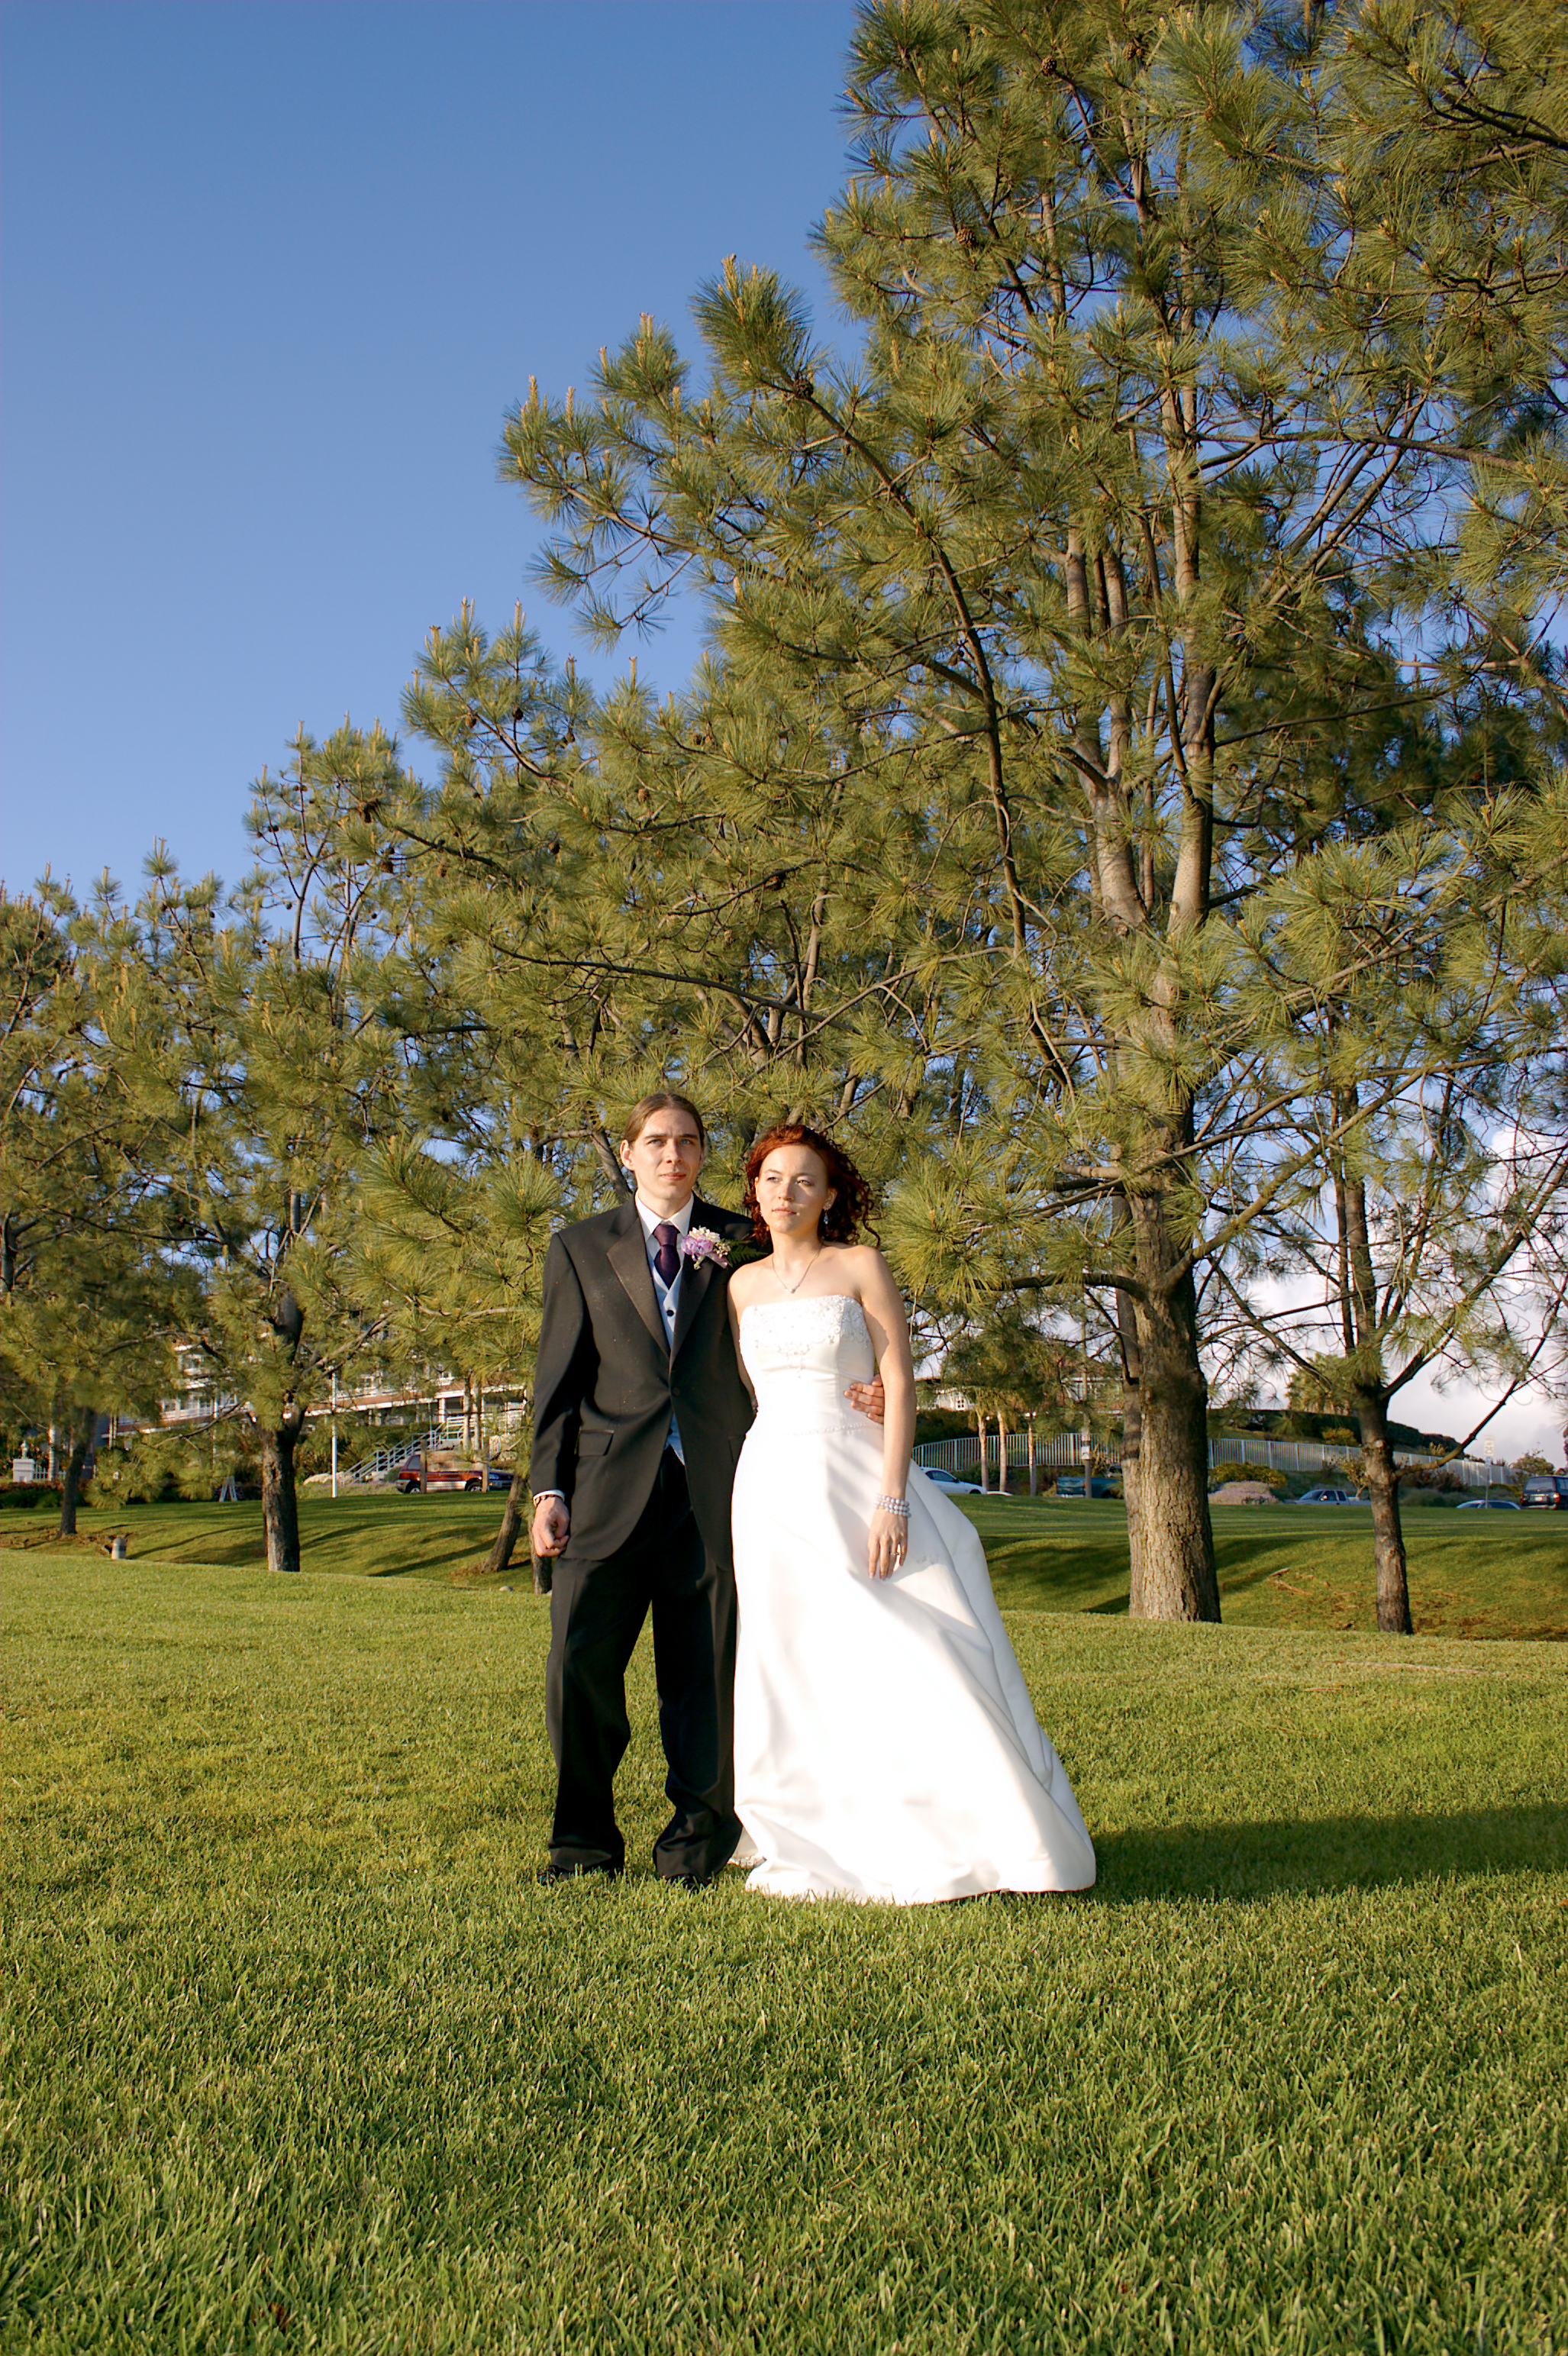
High-contrast color on blue sky and green grass original RAW
That favorite nightmare - a typical wedding couple (white dress, black tux) on a sunny afternoon. Welcome to blow-out hell. Linear Laundry really shines in this photo. Not only is the entire photo more saturated and balanced, but we keep details at the edges of brightness and shadow. Notice the beadwork on the front of the bride's dress. In the Linear Laundry version, we get much more detail.


Final notes.
Linear Laundry isn't a guaranteed perfect image every time. Sometimes, it may look too dark, and other times you might
want those highlights blown out for effect. But it is a pretty good way to get accurate, detailed images without much work. And I think it's better than the other options - but I'm obviously biased. Try it for yourself and see!
Frequently Asked Questions
-
Where'd the name 'Linear Laundry' come from?
I have no idea. It just showed up one day, and the metaphor on how the actions worked seemed pretty accurate, so it stuck. Maybe because I (literally) wrote part of it waiting for my laundry to finish at the laundromat.
I don't shoot in RAW / my camera doesn't support RAW. Can I still use Linear Laundry?
Maybe. Now, my ex-girlfriends will tell you that if I say maybe, "it really means no", but in this case, maybe means, "If you're willing to play with it a bit, it might work."I shoot in RAW, but on my Nikon / other non-Canon camera. Does Linear Laundry work for me?
It should, but I haven't tested it. Please give it a shot and let me know. I'd like to support other cameras other than the 300D, if such a thing is generically possible, so if you're interested in working with me and/or sending me some sample RAWs, let's talk.What options are you using in dcraw?
I run dcraw as follows: dcraw -3 -w -v -n -m $file. In order, that's:
- Output to 16-bit PSD
- Use camera white balance, if possible
- Print verbose messages while decoding
- Don't clip colors
- Don't convert camera RGB to sRGB
When are the windows versions of the batch conversion programs coming?
Probably never, sorry to say. Both of those apps are based on shell scripts that are included in the package, so you might be able to get them to run via cygwin. Unfortunately, I don't own or have access to a windows-based machine, so development isn't particularly likely. I believe there are similar free programs though, and the photoshop actions should work just fine.You seem to rag on Fred Miranda and his Photoshop actions an awful lot. What's the deal?
I've got nothing against Fred. I've never spoken to him, emailed him, or otherwise had contact. I'm a little disappointed that his program that was 'fully compatible' with my 300D didn't work as advertised, but that's about it. He's done some great work, and is fully entitled to charge for his efforts. Best of luck to him!